
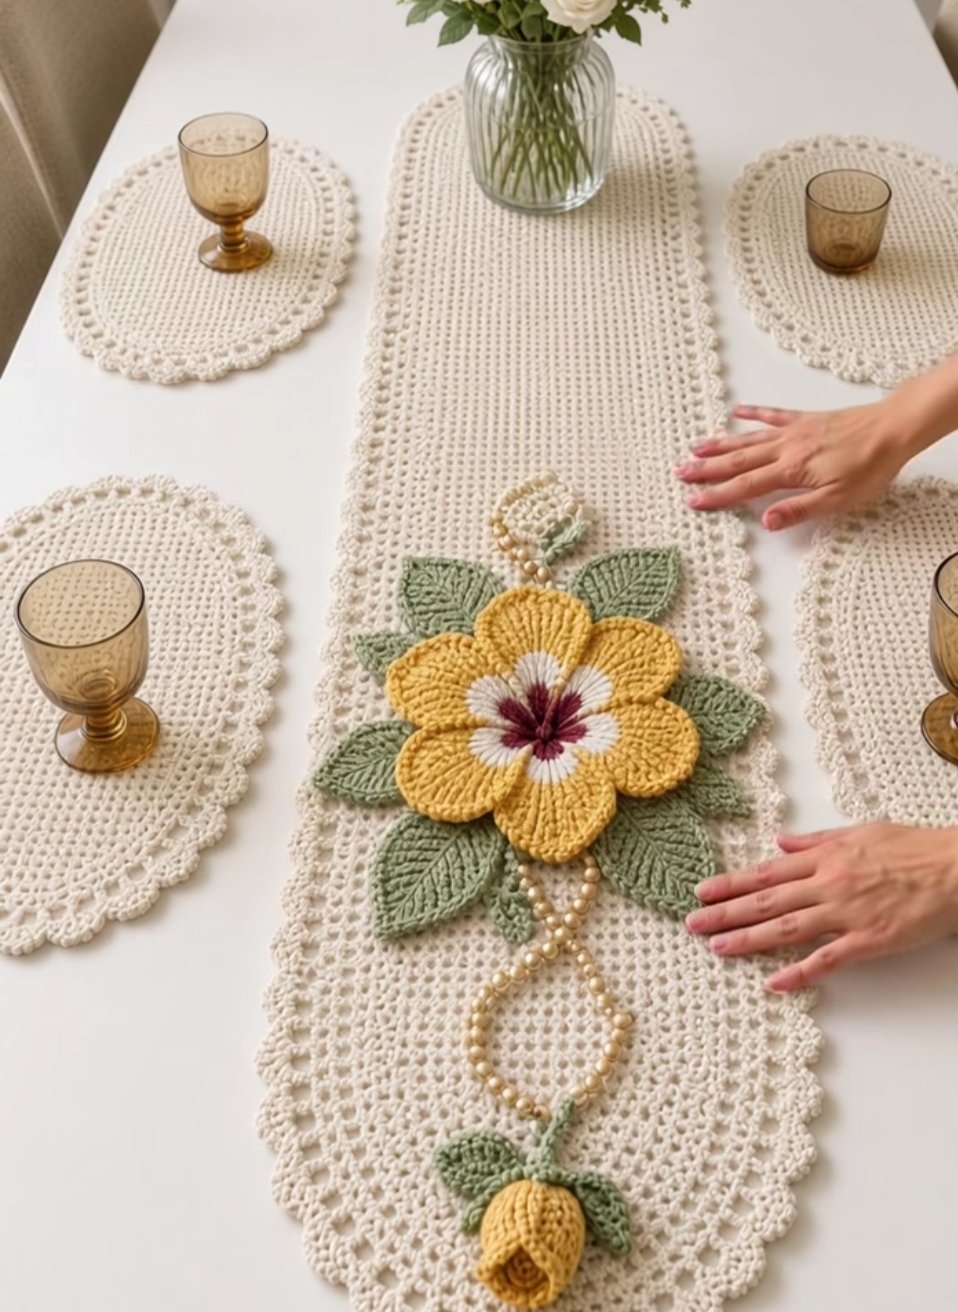
.
Detailed Row-by-Row Pattern
Skill level: Intermediate
US crochet terminology
Abbreviations
- ch = chain
- sc = single crochet
- hdc = half double crochet
- dc = double crochet
- tr = treble crochet
- sl st = slip stitch
- st/sts = stitch/stitches
- sk = skip
- sp = space
- rep = repeat
- inc = increase
- BLO = back loop only
- FO = fasten off
🧶 Materials
- Cream yarn — approximately 250–350 g
- Golden-yellow yarn — approximately 50–75 g
- Sage-green yarn — approximately 40–60 g
- Burgundy/dark red yarn — small amount
- Crochet hook appropriate for your yarn
- Tapestry needle
- Scissors
For a lace-like runner, a cotton yarn works especially well.
PART 1 — CREAM TABLE RUNNER
Foundation
Ch 73.
This produces a medium-width runner. Add or remove chains in multiples of 3 if you want to change the width.
Row 1
Sc in 2nd ch from hook.
Sc across.
Ch 1, turn.
72 sc
Row 2
Sc in each st across.
Ch 1, turn.
Row 3
Sc in first st.
Ch 2, sk 2 sts, sc in next st.
Rep across.
Ch 1, turn.
Row 4
Sc in first sc.
Work 3 dc in each ch-2 sp across.
Sc in final sc.
Ch 1, turn.
Row 5
Sc across.
Ch 1, turn.
Row 6
Sc in next st, ch 2, sk 2 sts.
Rep across.
Finish with sc.
Ch 1, turn.
Row 7
Sc in first sc.
3 dc in next ch-2 sp.
Rep across.
Sc in final stitch.
Ch 1, turn.
Rows 8–25
Repeat Rows 5–7.
This creates the openwork texture visible in the center of the runner.
PART 2 — DECORATIVE EDGE
Work around the entire runner.
Round 1
Sc evenly around all four sides.
At each corner:
sc, ch 2, sc
in the corner space.
Join with sl st.
Round 2
Sc in next 2 sts, 3 dc in next st.
Rep around.
At corners, work:
3 dc, ch 2, 3 dc
in the corner space.
Join with sl st.
Round 3 — Bobble Border
For a textured edge:
Sc in next 3 sts, 5-dc bobble in next st.
Rep around.
Join with sl st.
Fasten off and weave in ends.
🌻 PART 3 — GOLDEN FLOWER
The flower consists of two layers of petals.
Use golden-yellow yarn.
Flower Center — Round 1
Make a magic ring.
Work:
12 sc into ring.
Join with sl st.
Pull the ring closed.
Round 2
Ch 2.
Work 2 dc in each sc around.
Join with sl st.
You should have 24 sts.
First Petal Layer
Round 3
*Sl st in next st.
Ch 3.
Work 4 dc into same st.
Ch 3.
Sl st into same st.*
This forms the first petal.
Rep around to create 6 petals.
Fasten off.
Second Petal Layer
Attach golden yarn to the back of Round 2.
Round 4
Working behind the first petals:
*Sl st around the next available stitch.
Ch 3.
5 dc in same stitch.
Ch 3.
Sl st in same stitch.*
Rep around.
This creates the larger petals behind the first layer.
Round 5
To give the petals a defined edge:
Sc around each petal.
At the top of each petal work:
sc, hdc, sc
to create a slightly rounded point.
Fasten off.
❤️ FLOWER CENTER
Use burgundy yarn.
Attach yarn to the center of the flower.
Round 1
Work small stitches around the center:
Sl st, ch 1, 2 sc in next area.
Repeat around the center.
Round 2
Work small raised bobbles:
Sl st, 4-dc bobble, sl st.
Repeat around.
This creates the textured dark center.
🤍 WHITE/CREAM INNER PETALS
Using cream yarn, make small petals between the yellow petals.
For each small petal:
- Sl st into the center.
- Ch 4.
- 3 dc into the same space.
- Ch 4.
- Sl st into the center.
Repeat around the flower.
You should have approximately 6 small cream petals.
🌿 PART 4 — SAGE-GREEN LEAVES
Make approximately 8–10 leaves.
Leaf — Row 1
Ch 10.
Sc in 2nd ch from hook.
Hdc in next ch.
Dc in next 3 ch.
Tr in next 2 ch.
Dc in next 2 ch.
3 sc in final chain.
Continue along the opposite side of the foundation chain:
Dc in next 2 ch.
Tr in next 2 ch.
Dc in next 3 ch.
Hdc in next ch.
Sc in final ch.
Sl st to beginning.
Fasten off.
Leaf Vein
Attach green yarn along the center.
Sl st from the base toward the tip.
This gives the leaf its raised central vein.
Make some leaves slightly smaller by starting with 8 chains instead of 10.
🌿 PART 5 — TRAILING VINE
Use sage-green yarn.
Row 1
Ch 30.
Sl st back along the chain.
Row 2
Sc across.
Row 3
Ch 5, sl st into next 3 sts.
Rep across.
These small loops provide attachment points for the leaves.
Attach 3–5 leaves along the vine.
🌼 SMALL GOLDEN FLOWER
Use yellow yarn.
Round 1
Magic ring.
8 sc into ring.
Join.
Round 2
Ch 2, 2 dc, ch 2, sl st.
Rep around.
You should have 5–6 small petals.
Fasten off.
Attach the small flower to the end of the vine.
✨ GOLDEN DECORATIVE BOBBLES
For the small hanging decoration beneath the flower:
Use golden yarn.
Make several small bobbles:
5 dc together in the same stitch, then pull the loops together.
Repeat to create a short chain of decorative bobbles.
Attach this underneath the flower/vine.
🧵 PART 6 — ASSEMBLY
Place the finished cream runner flat.
Position the large flower approximately 10–15 cm from the lower end.
Arrange:
- 4–5 large green leaves around the flower
- 3–4 smaller leaves
- the trailing vine underneath
- small golden flower at the end
- golden bobbles between the decorative elements
Sew each component securely to the runner using a tapestry needle.
📏 SUGGESTED FINISHED SIZE
With medium-weight cotton yarn:
Width: approximately 30–35 cm
Length: approximately 90–120 cm
For a longer dining-table runner, simply repeat the center openwork section before adding the floral decoration.
Blocking
For the best lace effect, lightly dampen the finished runner and lay it flat.
Gently stretch the edges into a rectangle and pin them in place.
Allow to dry completely before removing the pins.
This will make the openwork stitches much more defined and give the runner the neat appearance seen in the video.
Important: Since this is reconstructed from the visual design in your uploaded video, treat the stitch counts as a working pattern rather than a verified designer-original pattern. A small tension or stitch-count adjustment may be needed to make the floral motif fit your runner perfectly.
