
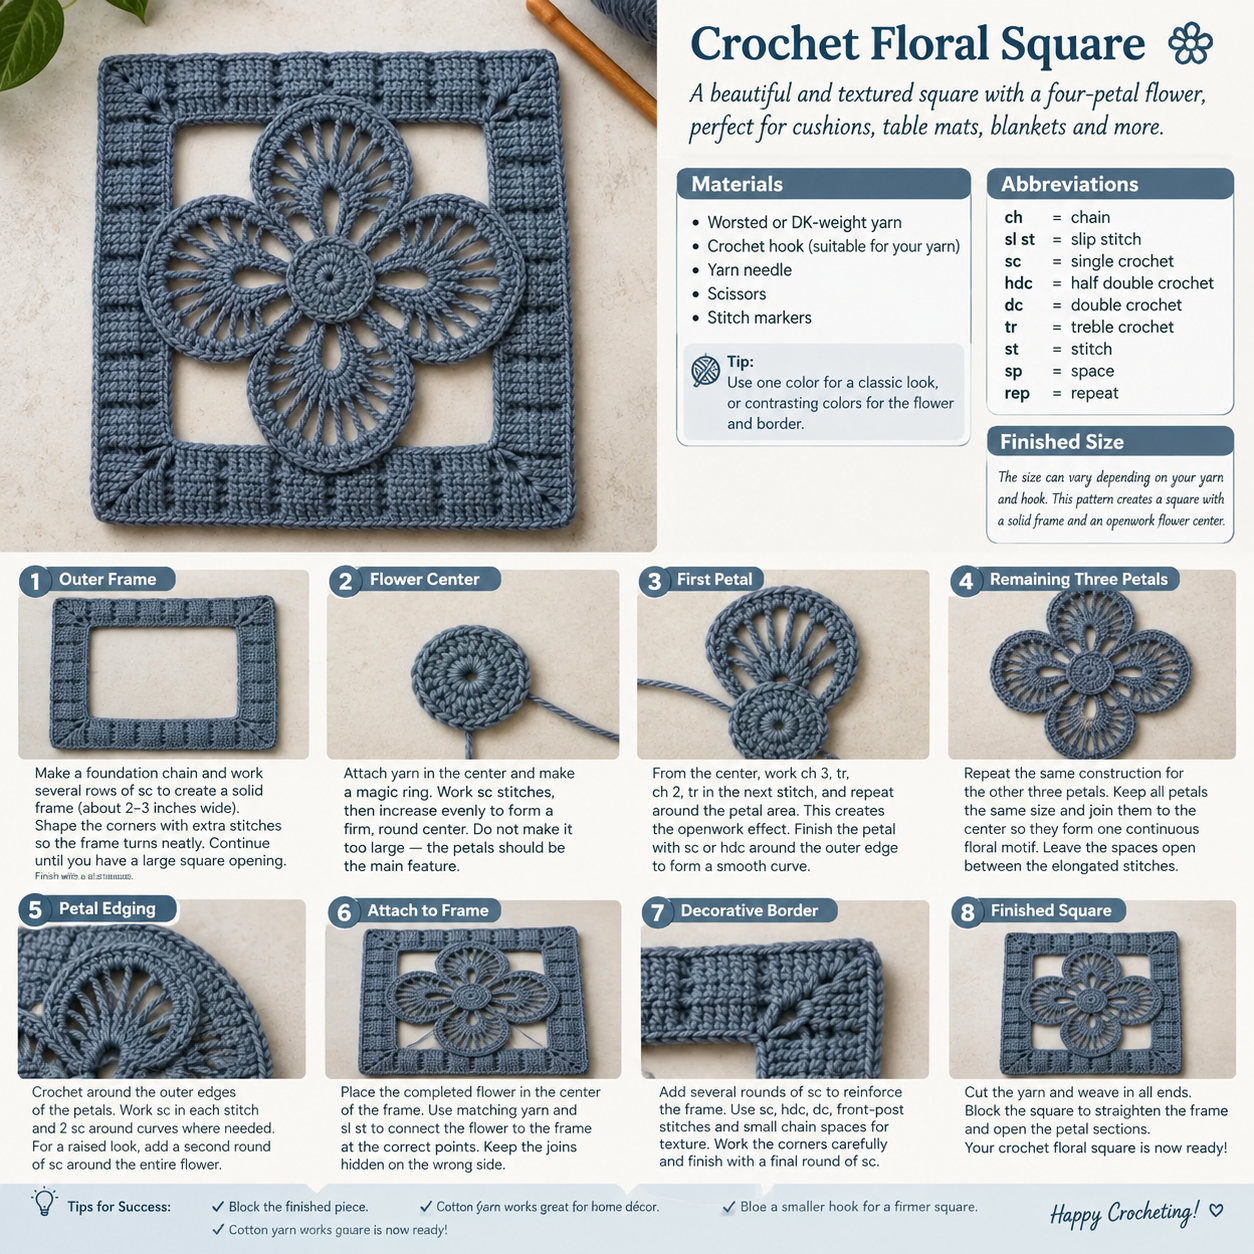
Create a beautiful textured crochet square featuring a four-petal openwork flower surrounded by a sturdy rectangular frame. This elegant design works wonderfully as a cushion cover, table mat, wall décor, blanket panel, or centerpiece.
The pattern below is written as a practical guide based on the design shown in the photo. Stitch counts may need small adjustments depending on your yarn, hook, and desired size.
🧶 Materials
- Worsted or DK-weight yarn
- Crochet hook suitable for your yarn
- Yarn needle
- Scissors
- Stitch markers
Suggested: Use one color for the entire motif for a classic, textured look, or use contrasting colors for the flower and border.
📏 Finished Shape
The project consists of:
- A solid rectangular outer frame
- Four openwork petals
- A round center joining all four petals
- Decorative corner details
- A textured border surrounding the open center
🌸 Crochet Pattern
Abbreviations
- ch – chain
- sl st – slip stitch
- sc – single crochet
- hdc – half double crochet
- dc – double crochet
- tr – treble crochet
- st – stitch
- sp – space
- rep – repeat
Step 1: Create the Outer Frame
Begin with a foundation chain long enough to create the desired width of your square.
Work several rows of sc, keeping your stitches tight and even. Continue until you have a solid rectangular frame approximately 2–3 inches wide.
Corner shaping
At each corner, work additional stitches into the corner space so that the frame turns neatly without curling.
Continue working around the entire piece until you have a large square opening in the center.
Finish with a sl st and weave in the end.
🌼 Step 2: Create the Flower Center
Attach yarn in the center area of the square.
Round 1
Make a small magic ring.
Work sc stitches into the ring and close the round with a slip stitch.
Round 2
Increase evenly around the circle to create a slightly larger center.
Round 3
Continue increasing until you have a firm, round flower center.
Do not make the center too large—the petals should remain the main feature of the design.
🌸 Step 3: First Petal
From the flower center, begin building the first petal.
Work a series of chain spaces and elongated stitches to create the openwork effect.
A typical sequence is:
ch 3, tr in the next stitch, ch 2, tr in the next stitch
Repeat around the petal area.
The long stitches create the characteristic radiating lines visible in the photograph.
Once the petal reaches the desired length, work around its outer edge using sc or hdc to create a smooth rounded border.
🌸 Step 4: Remaining Three Petals
Repeat the same construction for the other three petals.
Position them:
- One at the top
- One on the right
- One at the bottom
- One on the left
Keep the four petals approximately the same size.
As you work each petal, join its inner section to the flower center so the four sections form one continuous floral motif.
Important
Leave the spaces between the elongated stitches open. These openings are what give the flower its delicate lace-like appearance.
🌺 Step 5: Petal Edging
After all four petals are complete, crochet around their outer edges.
Work:
sc in each stitch, 2 sc around curves where necessary
This creates a firm outline and helps the petals maintain their rounded shape.
For a more raised appearance, you can work a second round of sc around the entire flower.
🧵 Step 6: Attach the Flower to the Frame
Place the completed flower in the center of the square frame.
Use matching yarn and small sl stitches to connect the flower to the surrounding frame at the appropriate points.
Try to keep the joins hidden on the wrong side of the work.
The open spaces around the petals should remain visible, just like the design in the photograph.
✨ Step 7: Decorative Border
Finally, reinforce the outside of the frame with several rounds of sc.
For the textured appearance shown in the photo, add small raised sections along the border using combinations of:
- sc
- hdc
- dc
- front-post stitches
- small chain spaces
Work the corners carefully so the square remains flat.
Finish with a final round of sc for a clean edge.
💡 Tips for a Beautiful Result
- Keep your tension consistent, especially when making the elongated petal stitches.
- Use a slightly smaller hook if you want a firmer, more structured square.
- Block the finished piece to straighten the frame and open up the flower.
- Cotton yarn is an excellent choice for table mats and decorative pieces.
- For a modern look, try one solid color such as dusty blue, cream, sage green, or terracotta.
🌷 Finishing
Once the final round is complete, cut the yarn and pull it through the last loop. Weave all ends securely into the back of the work.
Lightly block the finished square, shaping the four corners and gently opening the petal sections.
Your Crochet Floral Square is now ready to use as a decorative panel, centerpiece, cushion detail, or part of a larger crochet project.
