
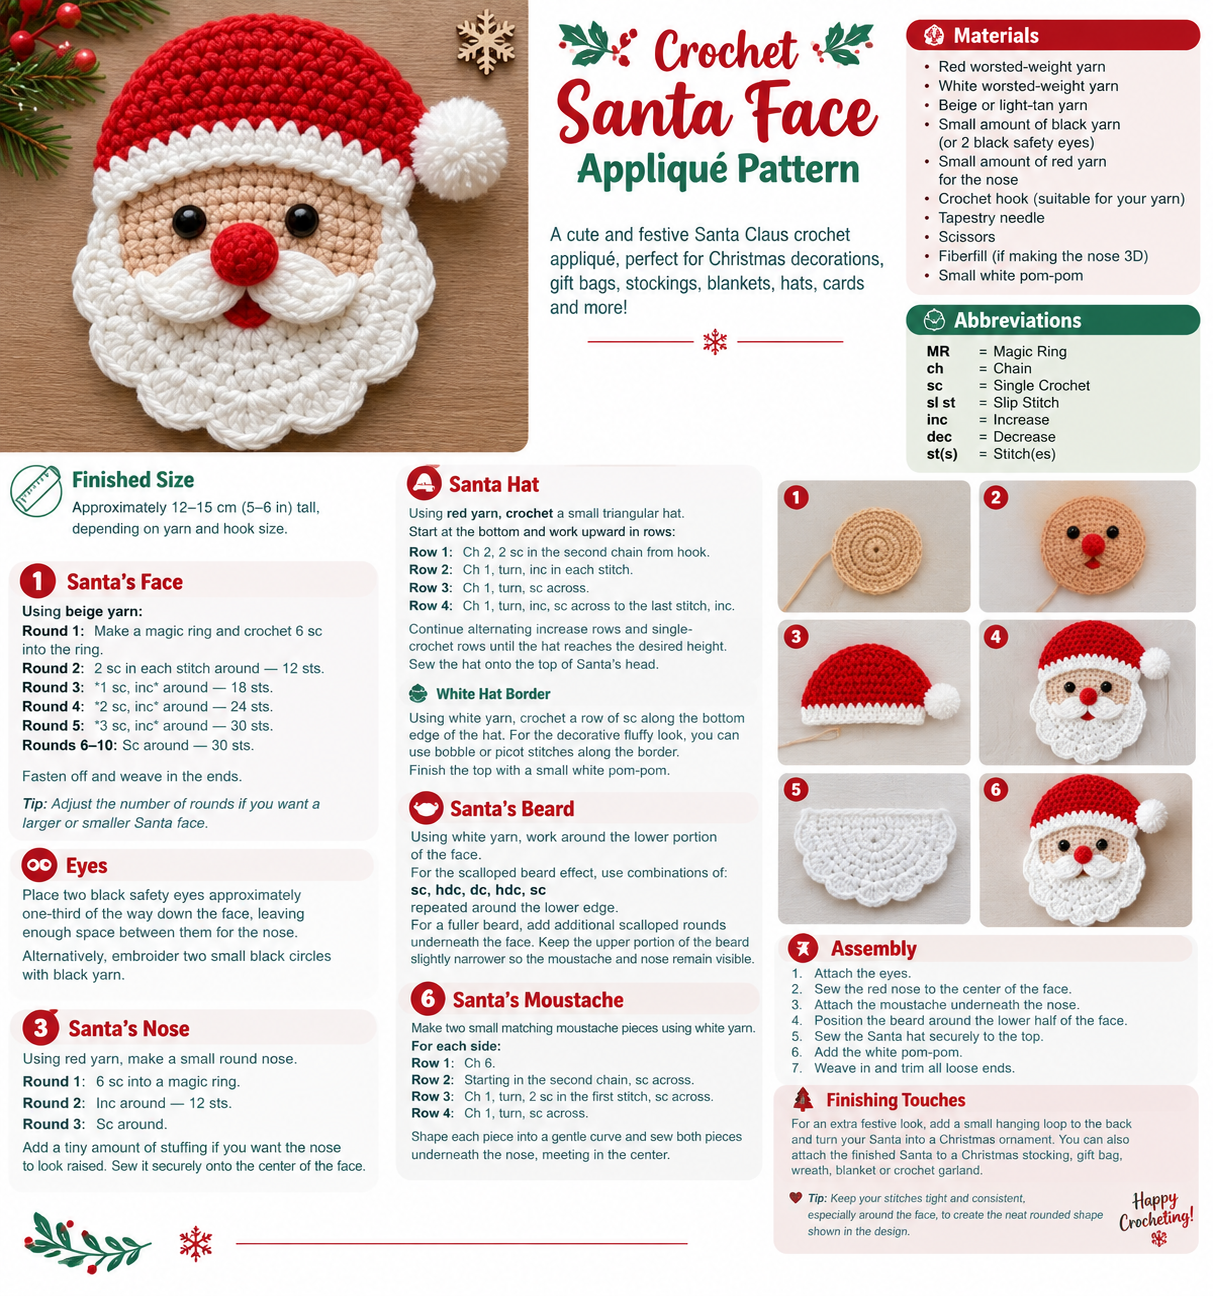
🎅 Crochet Santa Face Appliqué – Free Christmas Pattern
Create a cute crochet Santa Claus face perfect for Christmas decorations, gift bags, stockings, blankets, hats, cards, and festive home décor. This pattern combines simple crochet stitches with a fluffy white beard, Santa hat, moustache, and pom-pom.
🧶 Materials
- Red worsted-weight yarn
- White worsted-weight yarn
- Beige or light-tan yarn
- Small amount of black yarn or 2 black safety eyes
- Small amount of red yarn for the nose
- Crochet hook suitable for your yarn
- Tapestry needle
- Scissors
- Fiberfill, if making the nose 3D
- Small white pom-pom
📏 Finished Size
Approximately 12–15 cm (5–6 in) tall, depending on yarn and hook size.
✨ Abbreviations
- MR – Magic Ring
- ch – Chain
- sc – Single Crochet
- sl st – Slip Stitch
- inc – Increase
- dec – Decrease
- st(s) – Stitch(es)
🎅 Santa Face Pattern
1. Santa’s Face
Using beige yarn:
Round 1: Make a magic ring and crochet 6 sc into the ring.
Round 2: 2 sc in each stitch around — 12 sts.
Round 3: 1 sc, inc around — 18 sts.
Round 4: 2 sc, inc around — 24 sts.
Round 5: 3 sc, inc around — 30 sts.
Rounds 6–10: Sc around — 30 sts.
Fasten off and weave in the ends.
Adjust the number of rounds if you want a larger or smaller Santa face.
👀 2. Eyes
Place two black safety eyes approximately one-third of the way down the face, leaving enough space between them for the nose.
Alternatively, embroider two small black circles with black yarn.
🔴 3. Santa’s Nose
Using red yarn, make a small round nose.
Round 1: 6 sc into a magic ring.
Round 2: Inc around — 12 sts.
Round 3: Sc around.
Add a tiny amount of stuffing if you want the nose to look raised. Sew it securely onto the center of the face.
🎩 4. Santa Hat
Using red yarn, crochet a small triangular hat.
Start at the bottom and work upward in rows:
Row 1: Ch 2, 2 sc in the second chain from hook.
Row 2: Ch 1, turn, inc in each stitch.
Row 3: Ch 1, turn, sc across.
Row 4: Ch 1, turn, inc, sc across to the last stitch, inc.
Continue alternating increase rows and single-crochet rows until the hat reaches the desired height.
Sew the hat onto the top of Santa’s head.
White Hat Border
Using white yarn, crochet a row of sc along the bottom edge of the hat. For the decorative fluffy look, you can use bobble or picot stitches along the border.
Finish the top with a small white pom-pom.
🧔 5. Santa’s Beard
Using white yarn, work around the lower portion of the face.
For the scalloped beard effect, use combinations of:
sc, hdc, dc, hdc, sc
repeated around the lower edge.
For a fuller beard, add additional scalloped rounds underneath the face. Keep the upper portion of the beard slightly narrower so the moustache and nose remain visible.
👨🦳 6. Santa’s Moustache
Make two small matching moustache pieces using white yarn.
For each side:
Row 1: Ch 6.
Row 2: Starting in the second chain, sc across.
Row 3: Ch 1, turn, 2 sc in the first stitch, sc across.
Row 4: Ch 1, turn, sc across.
Shape each piece into a gentle curve and sew both pieces underneath the nose, meeting in the center.
🧵 7. Assembly
- Attach the eyes.
- Sew the red nose to the center of the face.
- Attach the moustache underneath the nose.
- Position the beard around the lower half of the face.
- Sew the Santa hat securely to the top.
- Add the white pom-pom.
- Weave in and trim all loose ends.
🎄 Finishing Touches
For an extra festive look, add a small hanging loop to the back and turn your Santa into a Christmas ornament. You can also attach the finished Santa to a Christmas stocking, gift bag, wreath, blanket, or crochet garland.
Tip: Keep your stitches tight and consistent, especially around the face, to create the neat rounded shape shown in the design.
