
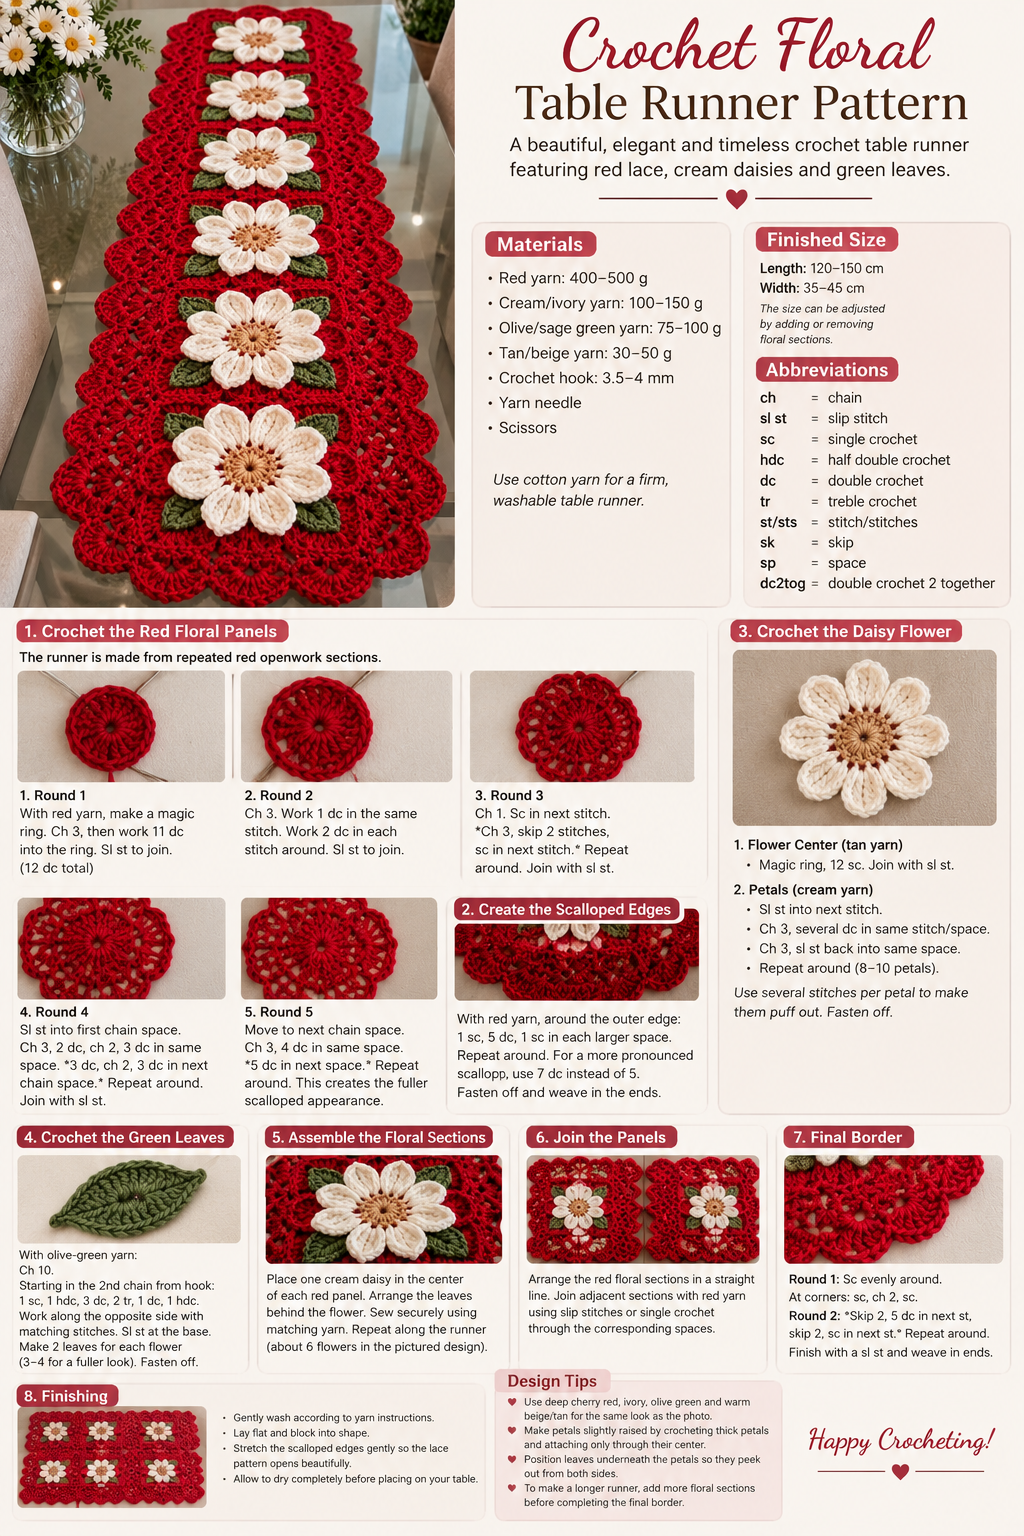
This beautiful crochet table runner features a rich deep-red openwork base, large cream daisy flowers, and olive-green leaves. Repeated floral motifs are joined together to create a long, elegant runner with a scalloped lace border.
Pattern note: The stitch counts below are a practical reconstruction based on the photo. Because the original designer’s written pattern is not provided, the exact stitch counts may vary slightly from the pictured piece.
Materials
- Red yarn: approximately 400–500 g
- Cream/ivory yarn: approximately 100–150 g
- Olive/sage green yarn: approximately 75–100 g
- Tan/beige yarn: approximately 30–50 g
- Crochet hook suitable for your yarn, approximately 3.5–4 mm
- Yarn needle
- Scissors
Choose cotton yarn for a firm, washable table runner.
Finished Size
Approximately:
- Length: 120–150 cm
- Width: 35–45 cm
The size can easily be adjusted by adding or removing floral sections.
Abbreviations
- ch – chain
- sl st – slip stitch
- sc – single crochet
- hdc – half double crochet
- dc – double crochet
- tr – treble crochet
- st/sts – stitch/stitches
- sk – skip
- sp – space
- dc2tog – double crochet 2 together
Part 1: Crochet the Red Floral Panels
The runner is made from repeated red openwork sections.
Round 1
With red yarn, make a magic ring.
Ch 3, then work 11 dc into the ring.
Sl st to the top of the beginning ch-3.
12 dc total.
Round 2
Ch 3.
Work 1 dc in the same stitch.
Work 2 dc in each stitch around.
Sl st to join.
Round 3
Ch 1.
Sc in the next stitch.
Ch 3, skip 2 stitches, sc in the next stitch.
Repeat around to create an open lace structure.
Join with a sl st.
Round 4
Sl st into the first chain space.
Ch 3, 2 dc, ch 2, 3 dc in the same space.
3 dc, ch 2, 3 dc in the next chain space.
Repeat around.
Join with a sl st.
Round 5
Move to the next chain space.
Ch 3, 4 dc in the same space.
5 dc in the next space.
Repeat around.
This creates the fuller red scalloped appearance visible around the flowers.
Part 2: Create the Scalloped Edges
Continue with red yarn around the outer edge.
In each larger space work:
1 sc, 5 dc, 1 sc
to form a rounded shell.
Repeat around the entire motif.
For a more pronounced scallop, use 7 dc instead of 5.
Fasten off and weave in the ends.
Part 3: Crochet the Daisy Flower 🌼
Use cream yarn.
Flower Center
With tan yarn, make a magic ring.
Work:
12 sc into the ring.
Join with a sl st.
Change to cream yarn.
Petals
For each petal:
- Sl st into the next stitch.
- Ch 3.
- Work several dc into the same stitch/space.
- Ch 3.
- Sl st back into the same space.
Repeat around to create approximately 8–10 rounded petals.
Pull the center slightly tight to give the flower a raised, dimensional appearance.
For the chunky petals shown in the photo, work several stitches into each petal so that they puff outward.
Fasten off.
Part 4: Crochet the Green Leaves 🍃
Using olive-green yarn:
Leaf
Ch 10.
Starting in the second chain from the hook:
- 1 sc
- 1 hdc
- 3 dc
- 2 tr
- 1 dc
- 1 hdc
Work along the opposite side of the chain with matching stitches to return to the beginning.
Sl st at the base.
Fasten off.
Make 2 leaves for each flower.
For a fuller flower arrangement, you can make 3–4 leaves around each daisy.
Part 5: Assemble the Floral Sections
Place one cream daisy in the center of each red panel.
Arrange the green leaves behind the flower, with one leaf pointing toward each side.
Sew the flowers and leaves securely onto the red crochet base using matching yarn.
Repeat the arrangement along the entire runner.
The pictured design uses approximately 6 large flowers.
Part 6: Join the Panels
Arrange the red floral sections in a straight line.
Join adjacent sections using red yarn and slip stitches through the corresponding spaces.
For a flatter seam, use a surface slip-stitch join.
For a more decorative raised seam, use single crochet between the motifs.
Continue joining until you reach your desired runner length.
Final Border
Once all sections are joined, crochet one final border around the entire runner.
With red yarn:
Border Round 1
Sc evenly around all four sides.
At each corner, work:
sc, ch 2, sc
to prevent the corners from curling.
Border Round 2
Skip 2 stitches, 5 dc in the next stitch, skip 2 stitches, sc in the next stitch.
Repeat around the runner.
This creates the characteristic scalloped lace edge.
Finish with a sl st and weave in all loose ends.
Finishing
Gently wash the runner according to the yarn manufacturer’s instructions.
Lay it flat and block it into shape.
Stretch the scalloped edges gently so the lace pattern opens beautifully.
Allow it to dry completely before placing it on your table.
Design Tips
❤️ For the look in the photo: use deep cherry red for the main body, ivory for the petals, muted olive green for the leaves, and warm beige/tan for the flower centers.
🌼 Make the flowers slightly raised by crocheting thick petals and attaching them only through their center.
🍃 Position the leaves underneath the petals so they peek out from both sides.
📏 To make a longer runner, simply add more repeating floral sections before completing the final border.
Pattern Summary
Red lace panels → join panels → add green leaves → attach cream daisies → add scalloped red border → block.
This gives you the same overall romantic floral, vintage-inspired crochet table-runner style shown in the reference photo.
