
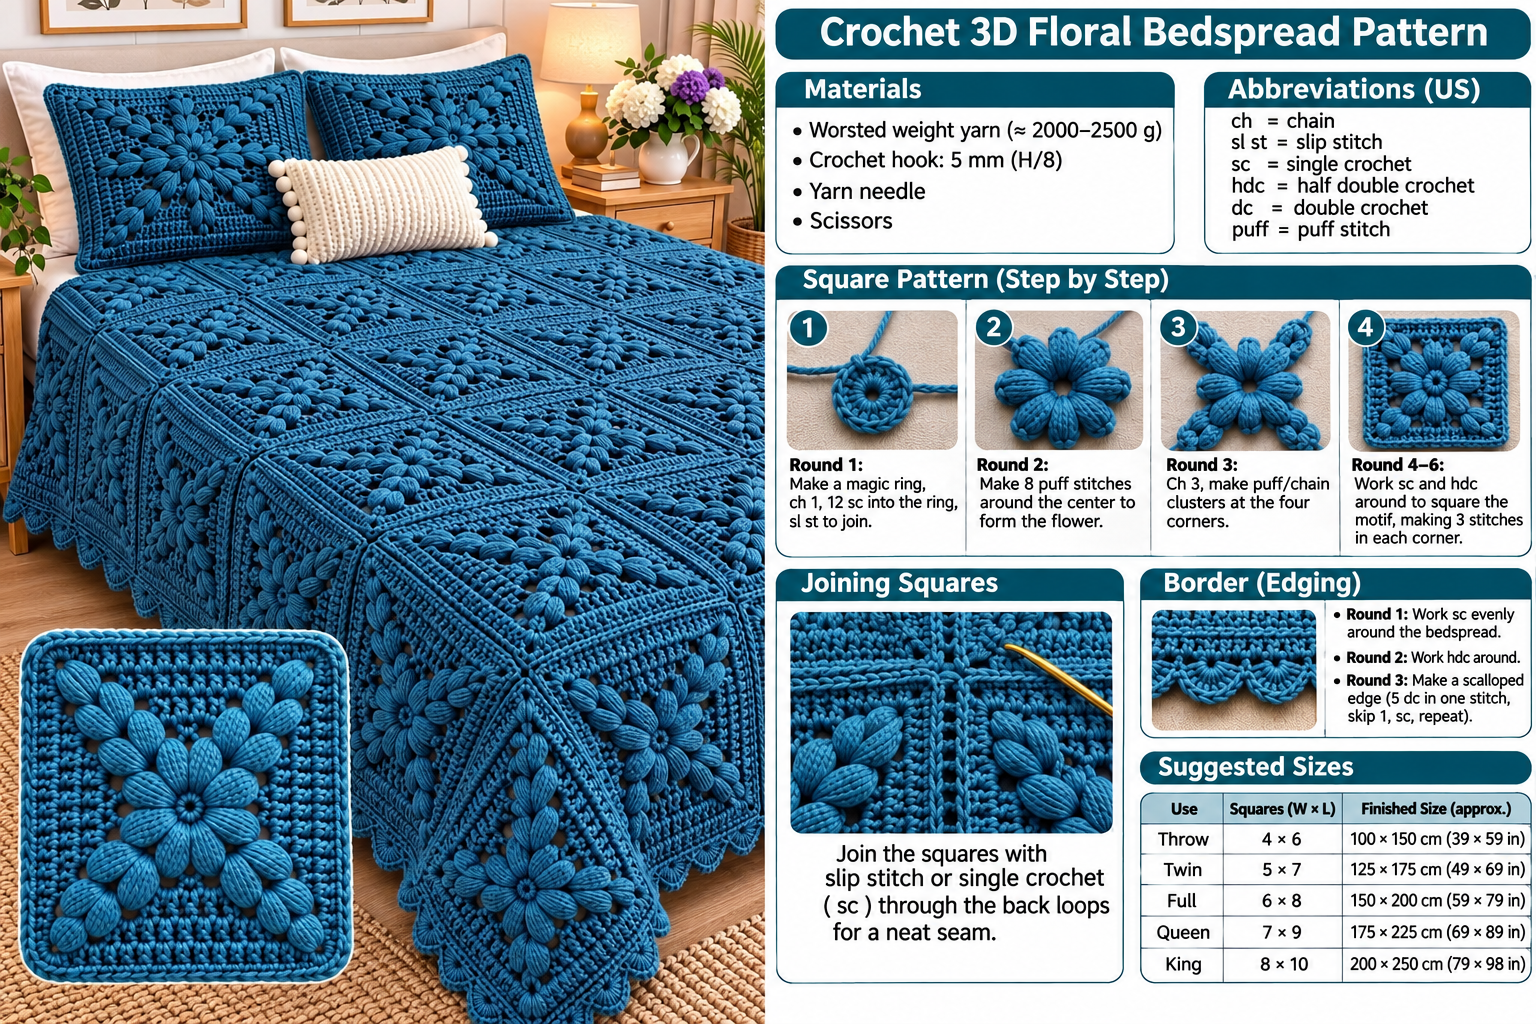
Create a stunning handmade blanket with this beautiful 3D Floral Crochet Blanket Pattern. Featuring gorgeous raised flowers, textured leaves, and elegant square motifs, this blanket is perfect for adding a cozy and luxurious touch to your bedroom or living room.
The rich blue color gives the blanket a sophisticated appearance, while the three-dimensional floral details make every square look like a little piece of crochet art.
Whether you’re an experienced crocheter or someone looking to learn new techniques, this project is a wonderful way to create a timeless handmade home decoration.
1. Materials You’ll Need
Before starting your crochet blanket, prepare the following supplies:
| Material | Quantity |
|---|---|
| Medium-weight yarn | Approximately 2,000–2,500 yards |
| Main color (deep blue) | 8–10 skeins |
| Crochet hook | 4.5–5 mm |
| Scissors | 1 |
| Yarn needle | 1 |
| Stitch markers | Optional |
| Measuring tape | 1 |
Color suggestions:
- Deep navy blue for an elegant look.
- Dusty blue for a softer appearance.
- Emerald green for a botanical style.
- Burgundy for a warm, luxurious blanket.
2. Crochet Abbreviations (US Terms)
- CH – Chain
- SL ST – Slip Stitch
- SC – Single Crochet
- HDC – Half Double Crochet
- DC – Double Crochet
- TR – Treble Crochet
- FPDC – Front Post Double Crochet
- BPDC – Back Post Double Crochet
- YO – Yarn Over
- ST – Stitch
- SK – Skip
- BLO – Back Loop Only
3. Pattern Overview
The blanket is constructed from individual textured floral squares joined together.
Each square features:
- A beautiful raised flower in the center.
- Three-dimensional elongated petal details.
- Decorative leaf-like stitches.
- A thick textured square border.
- A consistent size for easy joining.
Suggested finished size: Approximately 60 × 80 inches, depending on yarn, hook size, and number of squares.
4. Step-by-Step 3D Floral Square Pattern
Step 1: Create the Center Ring
- Make a magic ring.
- CH 1.
- Work 12 SC into the ring.
- SL ST into the first SC.
- Pull the magic ring tightly closed.
You now have the center of your flower.
Step 2: Crochet the Flower Petals
- CH 3.
- YO twice and insert your hook into the center ring.
- Work a cluster of elongated TR stitches.
- Repeat the process to form eight raised petals around the center.
- Secure each petal with a SL ST into the center ring.
Arrange the petals evenly to create a dimensional flower.
Step 3: Create the Raised Leaves
To achieve the beautiful botanical texture:
- Attach yarn around the flower center.
- CH 4.
- Work several elongated puff stitches into the surrounding spaces.
- Shape each puff into a pointed leaf by securing its top with a SC.
- Repeat around the flower to create decorative leaves.
- Add another layer of elongated petals between the first leaves for a fuller appearance.
Adjust the tension carefully to make the petals stand out.
Step 4: Build the Square Shape
Once your flower and leaves are complete:
- Attach yarn to an outer space.
- Work SC stitches around the motif.
- At each corner, work 3 SC into the same corner space.
- Continue with additional rows of SC and HDC.
- Keep increasing at the corners until the square reaches your desired size.
Make sure every square has the same number of rounds and dimensions.
Step 5: Add the Textured Border
For the elegant frame shown in the inspiration photo:
- Work one round of SC around the square.
- Work another round using alternating FPDC and BPDC.
- Finish with a final round of SC.
- SL ST to close the round.
This creates a structured frame that highlights the floral design.
5. Joining the Crochet Squares
Make enough squares to create your desired blanket size.
Suggested layout:
- 5 squares across.
- 7 squares long.
- 35 floral squares in total.
Join the squares using a slip-stitch join or single crochet join.
Keep the joins neat and consistent so the blanket has a beautiful finished appearance.
6. Crochet Blanket Border
For the final decorative edge:
Round 1: Work SC evenly around the entire blanket.
Round 2: Work HDC around all four sides, adding 3 HDC in each corner.
Round 3: Alternate FPDC and BPDC to create a thick textured edge.
Round 4: Work a decorative scalloped border using a combination of SC and DC stitches.
Fasten off and weave in all loose ends.
7. How to Care for Your Handmade Crochet Blanket
To keep your floral blanket beautiful:
- Wash according to the yarn manufacturer’s instructions.
- Use a gentle washing cycle when machine washing is suitable.
- Avoid high heat when drying.
- Lay flat to dry to maintain the shape of the floral motifs.
- Store in a clean, dry place.
8. Final Thoughts
Your beautiful 3D floral crochet blanket is more than just a cozy accessory. It is a handmade work of art that brings warmth, elegance, and personality to your home.
The combination of raised flowers, textured leaves, and decorative square motifs creates a stunning design that looks beautiful on beds, sofas, and cozy reading corners.
Choose your favorite yarn color, take your crochet hook, and start creating your own gorgeous floral masterpiece!
Happy Crocheting! 🧶💙
Pattern note: This is an original written interpretation inspired by the photograph, not a verified stitch-for-stitch reproduction. The exact stitch counts and petal construction may need adjustment to match your preferred yarn and finished square size.
