
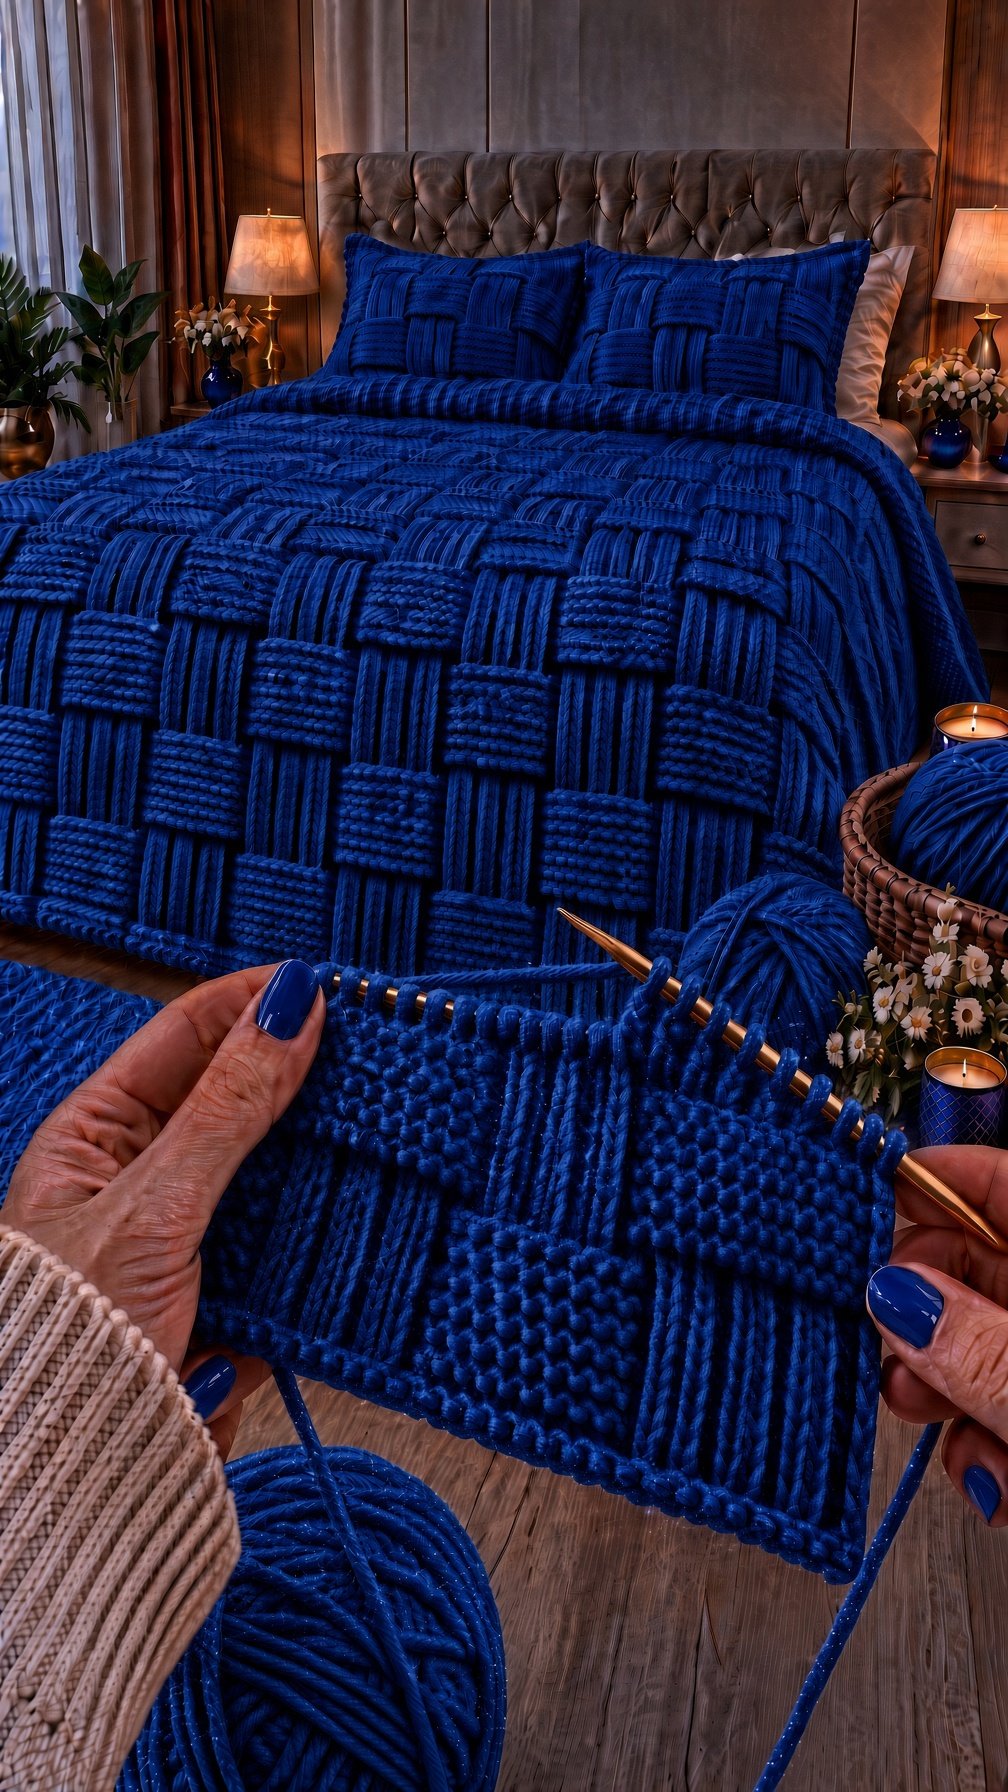
Royal Blue Basketweave Chunky Knit Blanket
Complete Knitting Pattern
Skill Level: Beginner to Intermediate
Technique: Basketweave knitting
Construction: Flat knitting, worked in rows
Finished Size: Approximately 52 × 64 inches (132 × 163 cm)
Language: US knitting terminology
Pattern Type: Home décor / Bedspread / Throw Blanket
1. Materials
To create a blanket similar to the reference image, you will need:
- Yarn: Super bulky or chunky yarn, approximately 6–8 mm thick.
- Color: Royal blue, sapphire blue, or deep cobalt blue.
- Yarn Quantity: Approximately 2,000–2,500 yards (1,830–2,286 meters), depending on yarn thickness and desired blanket size.
- Knitting Needles: US 11 (8 mm) circular knitting needles, 40–60 inches (100–150 cm) long.
- Stitch markers.
- Scissors.
- Tapestry needle.
- Measuring tape.
Circular needles are recommended because the blanket is wide. The blanket is knitted flat, not in the round.
Important: Yarn quantities are estimates. Thick chenille yarn may require a different quantity than chunky wool yarn. Always check your yarn’s recommended gauge.
2. Abbreviations
| Abbreviation | Meaning |
|---|---|
| CO | Cast on |
| K | Knit |
| P | Purl |
| St(s) | Stitch(es) |
| Rep | Repeat |
| RS | Right side |
| WS | Wrong side |
| BO | Bind off |
3. Gauge
Suggested gauge:
- 3 stitches = 1 inch (2.5 cm)
- 4 rows = 1 inch (2.5 cm)
Gauge may vary depending on yarn and needle size.
For a soft, flexible blanket, avoid knitting too tightly. The fabric should have enough drape to feel comfortable and luxurious.
Make a small swatch before beginning the blanket.
4. Understanding the Basketweave Stitch
The basketweave stitch creates a woven appearance by alternating blocks of knit and purl stitches.
The pattern uses:
- 8 stitches for each textured block.
- 8 rows for each block height.
- Alternating knit and purl sections.
- Reversed blocks to create the woven effect.
The stitch pattern is worked over a multiple of 16 stitches.
This creates a repeating geometric texture that resembles woven strips of fabric.
5. Finished Dimensions
The blanket is designed to measure approximately:
- Width: 52 inches (132 cm)
- Length: 64 inches (163 cm)
The size can be adjusted by adding or removing stitch repeats.
For a wider blanket, add another 16-stitch repeat.
For a longer blanket, work additional 16-row pattern repeats.
6. Full Knitting Instructions
Step 1: Cast On
Using your royal blue yarn and 8 mm circular knitting needles:
Cast on 156 stitches.
This includes:
- 6 stitches for the left border.
- 144 stitches for the basketweave pattern.
- 6 stitches for the right border.
The six stitches on each side will be worked in garter stitch to create a neat border.
Step 2: Knit the Bottom Border
Work every stitch in knit stitch for 8 rows.
This creates a simple garter stitch border.
The border helps prevent the blanket from curling and provides a clean finish.
Step 3: Begin the Basketweave Pattern
The basketweave section is worked over 144 stitches.
The remaining 12 stitches are the border stitches.
Basketweave Pattern Repeat
Rows 1, 3, 5, and 7 – Right Side
Knit 6 border stitches.
Repeat the following across the center 144 stitches:
- Knit 8 stitches.
- Purl 8 stitches.
Knit the final 6 border stitches.
Rows 2, 4, 6, and 8 – Wrong Side
Knit 6 border stitches.
Repeat the following across the center 144 stitches:
- Purl 8 stitches.
- Knit 8 stitches.
Knit the final 6 border stitches.
Rows 9, 11, 13, and 15 – Right Side
Knit 6 border stitches.
Repeat the following across the center 144 stitches:
- Purl 8 stitches.
- Knit 8 stitches.
Knit the final 6 border stitches.
Rows 10, 12, 14, and 16 – Wrong Side
Knit 6 border stitches.
Repeat the following across the center 144 stitches:
- Knit 8 stitches.
- Purl 8 stitches.
Knit the final 6 border stitches.
This completes one 16-row basketweave repeat.
The pattern creates alternating raised blocks that give the blanket its distinctive woven appearance.
7. Repeat the Basketweave Pattern
Continue repeating Rows 1–16 until the blanket reaches approximately 60 inches (152 cm) from the cast-on edge.
For a finished length of approximately 64 inches (163 cm), the blanket will typically require:
- 8 rows of bottom border.
- Approximately 56 rows of basketweave pattern.
- 8 rows of top border.
This is approximately 4 pattern repeats, plus the borders.
Adjust the number of repeats according to your gauge and desired length.
8. Knit the Top Border
Once the blanket reaches the desired length:
Work every stitch in knit stitch for 8 rows.
This creates a matching garter stitch border at the top.
The border frames the basketweave texture and provides a neat finish.
9. Bind Off
Bind off all stitches loosely in knit stitch.
Avoid binding off too tightly, as this can cause the top edge to pull inward.
Cut the yarn, leaving a tail approximately 8–10 inches (20–25 cm) long.
Thread the tail through a tapestry needle and weave it securely into the fabric.
Weave in all remaining yarn ends.
10. Optional Decorative Border
For a more luxurious finish, you can add a wider border around the blanket.
A simple garter stitch border is recommended.
To achieve this:
- Work 10–12 stitches at each side in garter stitch.
- Work 10–12 rows at the beginning and end of the blanket.
- Keep the basketweave pattern centered.
This creates a substantial frame around the blanket, making it especially attractive when displayed on a bed.
11. Matching Knitted Pillow Pattern
The blanket can be paired with matching royal blue basketweave pillows.
Pillow Size
Approximately 20 × 20 inches (50 × 50 cm).
Materials
- Royal blue chunky yarn.
- 8 mm knitting needles.
- Pillow insert.
- Tapestry needle.
Instructions
Cast on 64 stitches.
Work 6 rows in garter stitch.
Work the basketweave pattern over the center stitches using 8-stitch blocks.
Continue until the piece measures approximately 20 inches (50 cm).
Work another 6 rows in garter stitch.
Bind off loosely.
Make a second piece in the same way.
Place the two pieces together with the right sides facing inward.
Seam three sides, insert the pillow form, and close the final side.
Alternatively, add buttons or a zipper to create a removable pillow cover.
12. Finishing and Care
To achieve the best results:
- Weave in all yarn ends securely.
- Gently shape the blanket to its finished dimensions.
- Avoid stretching the basketweave blocks.
- Follow the care instructions for your chosen yarn.
- Hand wash delicate wool yarn when recommended.
- Use a gentle wash cycle only if the yarn label permits machine washing.
- Dry flat to preserve the blanket’s shape.
For chenille yarn, avoid excessive pulling or aggressive blocking, as this may distort the textured stitches.
13. Tips for a Beautiful Basketweave Blanket
Choose the right yarn.
A thick, soft yarn will create a more pronounced basketweave texture.
Keep your tension consistent.
Even tension helps the raised blocks maintain their shape.
Use stitch markers.
Place markers between the 8-stitch blocks to make the pattern easier to follow.
Check your dimensions regularly.
Measure the blanket every few pattern repeats to ensure the finished size is correct.
Use a deep royal blue.
A saturated blue shade highlights the raised texture and creates the luxurious appearance shown in the inspiration image.
14. Pattern Summary
| Feature | Details |
|---|---|
| Finished Size | 52 × 64 inches |
| Cast On | 156 stitches |
| Main Pattern | Basketweave stitch |
| Stitch Repeat | 16 stitches |
| Row Repeat | 16 rows |
| Border | 6 stitches each side, 8 rows top and bottom |
| Yarn | Super bulky / chunky |
| Needle Size | US 11 (8 mm) |
| Construction | Flat knitting |
| Skill Level | Beginner to Intermediate |
Final Thoughts
The Royal Blue Basketweave Chunky Knit Blanket is a beautiful project for anyone who loves luxurious textures and cozy handmade décor.
The repeating woven stitch creates a rich, dimensional appearance, while the deep royal blue color adds elegance and sophistication.
Use this blanket as a bedspread, a decorative throw, or a handmade gift.
Pair it with matching textured pillows to create a coordinated bedroom inspired by the luxurious design in the reference image.
Happy knitting!
