
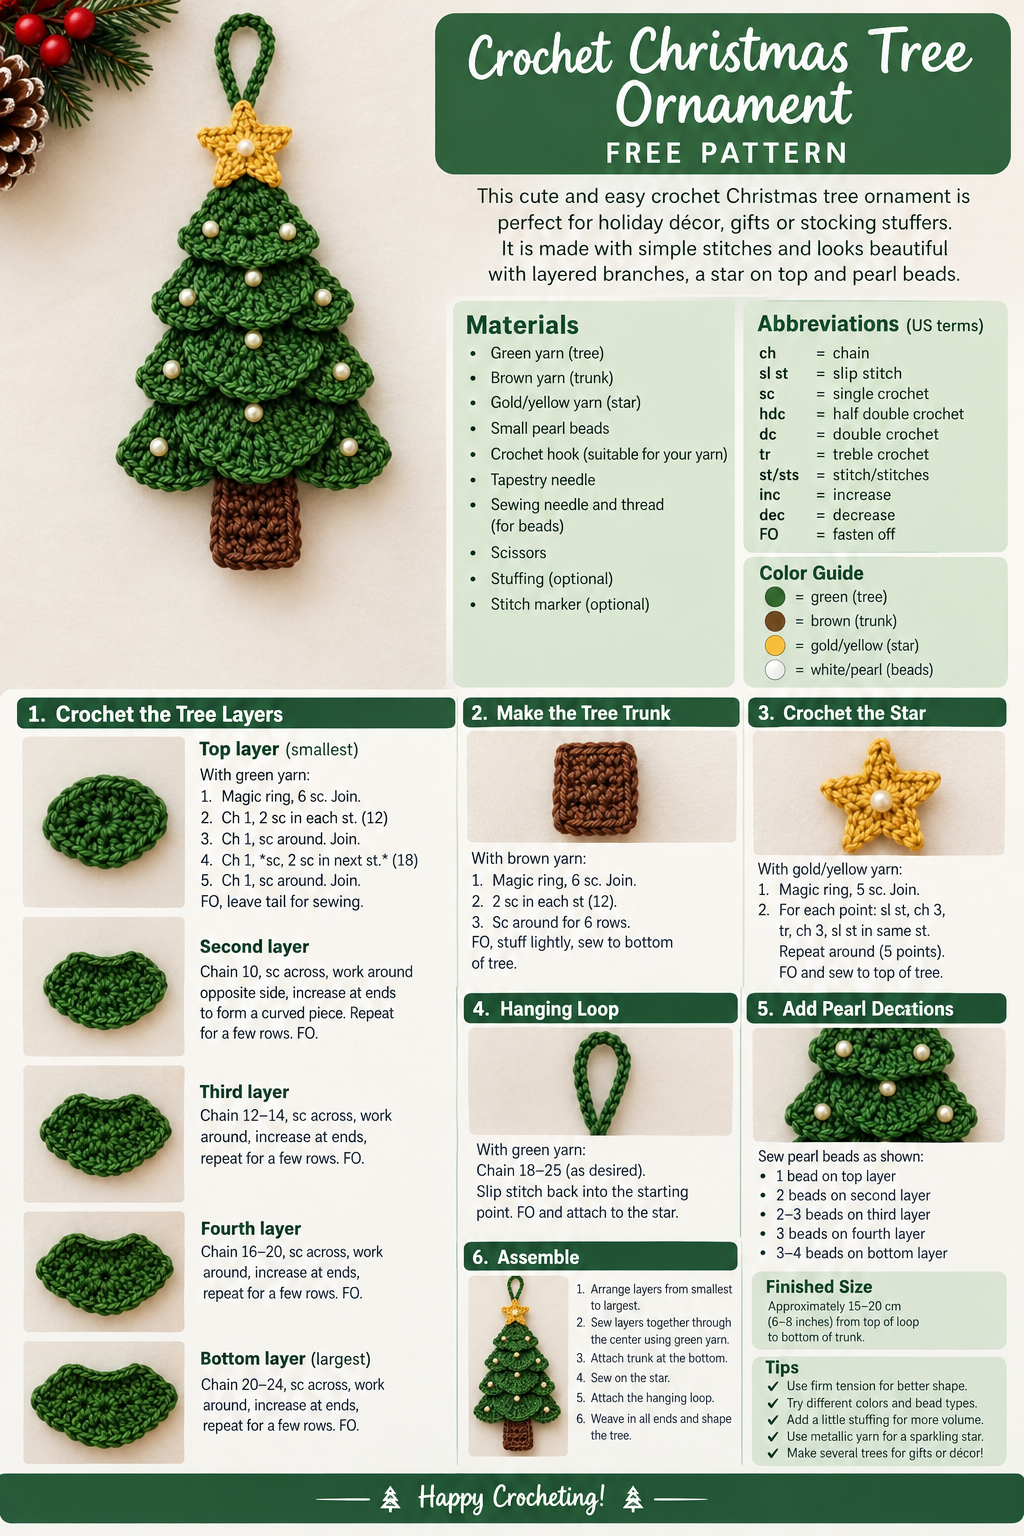
Create a charming handmade crochet Christmas tree ornament inspired by the tree shown in the photo. This layered tree is made from green yarn, decorated with small pearl beads, topped with a golden star, and finished with a brown trunk and hanging loop.
It makes a lovely Christmas tree decoration, handmade gift, stocking filler, or holiday craft project.
Materials
- Green crochet yarn
- Brown crochet yarn
- Gold/yellow crochet yarn
- Small white or pearl beads
- Crochet hook suitable for your yarn
- Tapestry needle
- Sewing needle and thread for attaching beads
- Scissors
- Small amount of stuffing, optional
- Stitch marker, optional
Suggested yarn
Use a medium-weight cotton or acrylic yarn. You can change the colors to suit your Christmas theme.
Color guide:
- Green – tree
- Brown – trunk
- Gold – star
- White/pearl – decorations
Abbreviations
US crochet terminology:
- ch – chain
- sl st – slip stitch
- sc – single crochet
- hdc – half double crochet
- dc – double crochet
- tr – treble crochet
- st/sts – stitch/stitches
- inc – increase
- dec – decrease
- FO – fasten off
Part 1 – Crochet Christmas Tree
The tree is constructed in several overlapping sections. Each section becomes slightly wider as you work downward, giving the ornament its distinctive layered Christmas-tree appearance.
Top section
With green yarn:
Round 1: Make a magic ring and work 6 sc into the ring. Join with a sl st.
Round 2: Ch 1. Work 2 sc in each stitch around. Join.
12 sts
Round 3: Ch 1. Sc around. Join.
Round 4: Ch 1. Sc in next stitch, 2 sc in next stitch. Repeat around. Join.
18 sts
Round 5: Ch 1. Sc around. Join.
Fasten off, leaving a long tail for sewing if desired.
Second tree layer
With green yarn, make another small semicircular or rounded layer.
Work approximately:
- Chain 10.
- Beginning in the second chain from the hook, sc across.
- Continue working around the opposite side of the foundation chain.
- Increase gradually at the ends so the piece forms a rounded, slightly curved branch section.
- Work several rows, allowing the bottom edge to become wider.
Fasten off.
Repeat the process for the remaining layers, making each layer progressively wider.
Suggested sizes
You can use approximately:
- Top layer: 12–15 stitches wide
- Second layer: 20–25 stitches wide
- Third layer: 30–35 stitches wide
- Fourth layer: 40–45 stitches wide
- Bottom layer: 50–60 stitches wide
The exact stitch count can be adjusted depending on your yarn and hook size.
Creating the Layered Tree
Place the crocheted sections on top of one another, with the smallest piece at the top and the largest piece at the bottom.
Sew the layers together through their centers using green yarn.
Do not sew the outer edges completely flat. Allow the edges to remain slightly raised and curved. This creates the ruffled branches visible in the finished ornament.
For extra dimension, lightly stuff the upper portions before closing them.
Crochet Tree Trunk
Using brown yarn:
Round 1: Make a magic ring and crochet 6 sc into the ring.
Round 2: 2 sc in each stitch around.
12 sts
Rounds 3–8: Sc in each stitch around.
Fasten off, leaving a sewing tail.
Lightly stuff the trunk if you want a fuller appearance.
Sew the trunk securely to the bottom center of the tree.
Crochet Star ⭐
Use gold or yellow yarn.
Star center
Make a magic ring.
Work:
Round 1: 5 sc into the ring. Join with a sl st.
For the points, work five repeated sections:
Point:
Sl st into the next stitch, ch 3, tr, ch 3, sl st into the same stitch.
Repeat around the center until you have five star points.
Fasten off and weave in the ends.
You can place a small pearl or white bead in the center of the star.
Sew the star securely to the top of the Christmas tree.
Hanging Loop
Using green yarn, attach the yarn to the top of the star/tree.
Chain approximately 18–25 stitches, depending on how large you want the hanging loop.
Slip stitch back into the starting point to form a loop.
Fasten off securely and hide the yarn ends.
Adding the Pearl Decorations
The tree in the photograph is decorated with small pearl-like beads.
Arrange the beads across the different layers of the tree.
A simple arrangement is:
- 1 bead near the top
- 2 beads on the second layer
- 2–3 beads on the third layer
- 3 beads on the fourth layer
- 3–4 beads on the bottom layer
Sew each bead firmly into place using matching thread.
Safety note: If the ornament may be handled by young children, replace loose beads with embroidered dots or crocheted decorations.
Finishing
Carefully weave in all yarn ends.
Gently shape the tree with your fingers so that each layer curves outward.
If necessary, lightly block the crocheted pieces to create a neat shape.
Your finished ornament should have:
⭐ Gold star
↓
🌲 Small upper branches
↓
🌲 Middle layered branches
↓
🌲 Wide bottom branches
↓
🪵 Brown trunk
↓
⭕ Hanging loop
Size
Using medium-weight yarn, the finished ornament will typically measure approximately 15–20 cm (6–8 inches) from the top of the hanging loop to the bottom of the trunk.
The final size can easily be changed by using thicker or thinner yarn and a corresponding crochet hook.
Tips for a Beautiful Finished Tree
✨ Use a firm crochet tension. This helps the tree keep its shape.
✨ Choose a rich forest green for a traditional Christmas appearance.
✨ Add gold beads or tiny bells instead of pearls for a different style.
✨ Make several trees in different colors such as white, red, emerald green, or cream.
✨ Use metallic yarn for the star to give the ornament a festive sparkle.
✨ Add a little stuffing between the layers if you want a more dimensional tree.
Easy Christmas Gift Idea
Make several of these crochet Christmas trees and personalize each one with different decorations. They are perfect for:
- Christmas tree ornaments
- Handmade Christmas gifts
- Holiday markets
- Gift wrapping decorations
- Christmas table decorations
- Stocking stuffers
- DIY holiday décor
