
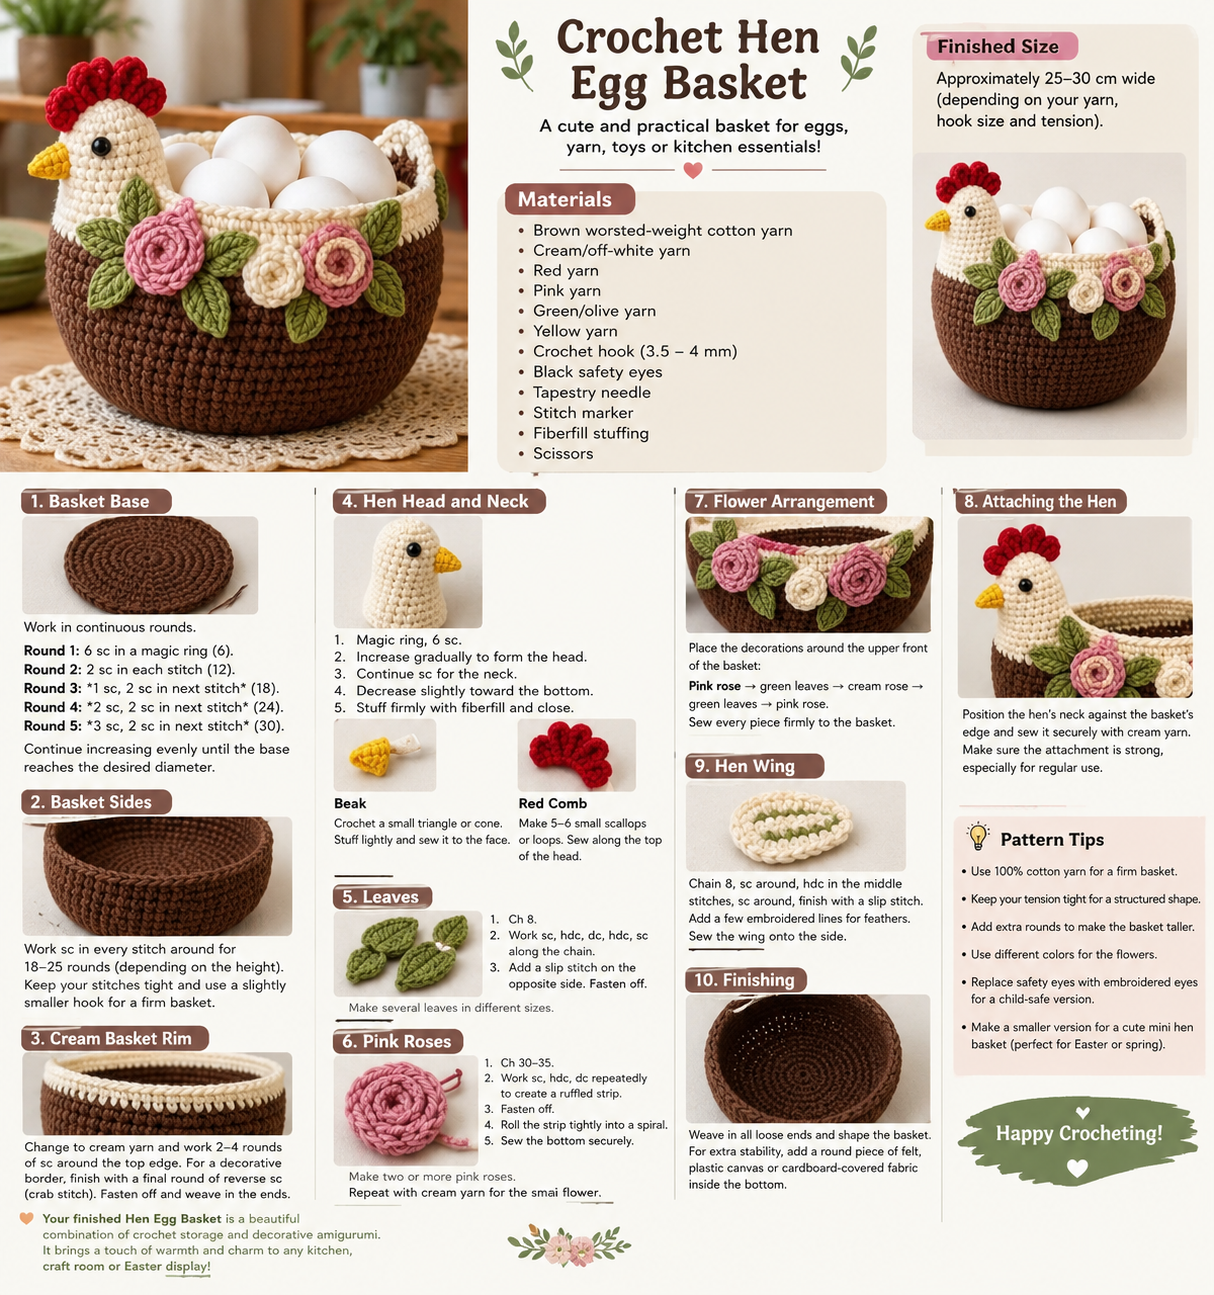
Create a charming Crochet Hen Egg Basket that combines a sturdy brown storage basket with a cute chicken head, colorful flowers, and leafy details. This handmade basket is perfect for holding eggs, yarn, small toys, craft supplies, or kitchen essentials.
Pattern note: The photo does not show the original written pattern, so the instructions below are an original, approximate pattern designed to recreate the look of the pictured basket. Adjust stitch counts as needed for your yarn and hook.
🧶 Materials
- Brown worsted-weight cotton yarn
- Cream/off-white yarn
- Red yarn
- Pink yarn
- Green/olive yarn
- Yellow yarn
- Crochet hook suitable for your yarn, approximately 3.5–4 mm
- Black safety eyes
- Tapestry needle
- Stitch marker
- Fiberfill stuffing
- Scissors
📏 Finished Size
The basket can be approximately 25–30 cm wide, depending on your yarn, hook size, and tension.
🧺 Basket Base
Work in continuous rounds.
Round 1
Make a magic ring and crochet 6 sc into the ring.
Round 2
2 sc in each stitch around — 12 sc.
Round 3
1 sc, 2 sc in next stitch around — 18 sc.
Round 4
2 sc, 2 sc in next stitch around — 24 sc.
Round 5
3 sc, 2 sc in next stitch around — 30 sc.
Continue increasing evenly until the base reaches the desired diameter.
Basket Sides
Once the base is large enough, stop increasing.
Work sc in every stitch around for approximately 18–25 rounds, depending on the desired basket height.
For a firm basket, keep your stitches tight and use a slightly smaller hook if necessary.
🤍 Cream Basket Rim
Change to cream yarn.
Work 2–4 rounds of sc around the top edge.
For a decorative raised border, work a final round of reverse single crochet (crab stitch).
Fasten off and weave in the ends.
🐔 Crochet Hen Head and Neck
Using cream yarn:
- Start with a magic ring.
- Work 6 sc into the ring.
- Increase gradually to create a rounded head.
- Continue working sc without increases to form the neck.
- Begin decreasing slightly toward the bottom.
- Stuff firmly with fiberfill.
- Close the opening securely.
Attach two black safety eyes.
🟡 Beak
Using yellow yarn:
- Crochet a small triangular or cone-shaped piece.
- Stuff lightly.
- Sew it to the front of the hen’s face.
❤️ Red Hen Comb
Using red yarn, crochet several small rounded loops or scalloped sections.
A simple method is to make 5–6 small chain loops, working several stitches into each loop to create rounded scallops.
Sew the finished comb along the top of the hen’s head.
🌿 Leaves
Using green yarn:
- Chain approximately 8 stitches.
- Work sc, hdc, dc, hdc, sc along the chain.
- Add a small slip stitch along the opposite side.
- Fasten off.
Make several leaves in different sizes.
Sew them around the flowers on the front of the basket.
🌸 Pink Crochet Roses
The flowers are made as small crochet roses.
Using pink yarn:
- Chain about 30–35 stitches.
- Work a row of stitches such as sc, hdc, dc repeatedly to create a slightly ruffled strip.
- Fasten off.
- Roll the strip tightly from one end.
- Shape it into a spiral rose.
- Sew the bottom securely.
Make two or more pink roses for the basket.
For the smaller cream flower, repeat the same technique with cream yarn.
🌿 Flower Arrangement
Place the decorations around the upper front of the basket:
Pink rose → green leaves → cream rose → green leaves → pink rose
Sew every piece firmly to the basket so the decorations remain secure.
🐔 Attaching the Hen
Position the hen’s neck against the upper edge of the basket.
Sew the neck securely to the basket using matching cream yarn.
Make sure the attachment is strong, especially if the basket will be used regularly.
🐔 Hen Wing
Using cream or green yarn, crochet a small oval wing.
A simple wing can be made with:
- Chain 8
- sc around the chain
- hdc in the middle stitches
- sc around the remaining edge
- Finish with a slip stitch
Add a few embroidered green or cream lines to create feather details.
Sew the wing onto the side of the hen.
🥚 Finishing the Egg Basket
Weave in all loose ends and gently shape the basket.
For extra stability, you can place a round piece of sturdy felt, plastic canvas, or cardboard-covered fabric inside the bottom.
Your finished basket is now ready to hold eggs, yarn, toys, or other small items.
✨ Pattern Tips
- Use 100% cotton yarn for a firm basket.
- Keep your tension tight for a structured shape.
- Add extra rounds to make the basket taller.
- Make the flowers in different colors for a completely different look.
- You can replace the safety eyes with embroidered eyes for a child-safe version.
- The same pattern can be made smaller to create a cute mini hen basket for Easter or spring decorations.
🌷 Final Result
This Hen Egg Basket is a beautiful combination of crochet storage and decorative amigurumi. The chocolate-brown basket, cream hen, red comb, pink roses, and green leaves give it a warm farmhouse style that works beautifully in a kitchen, craft room, or Easter display.
