
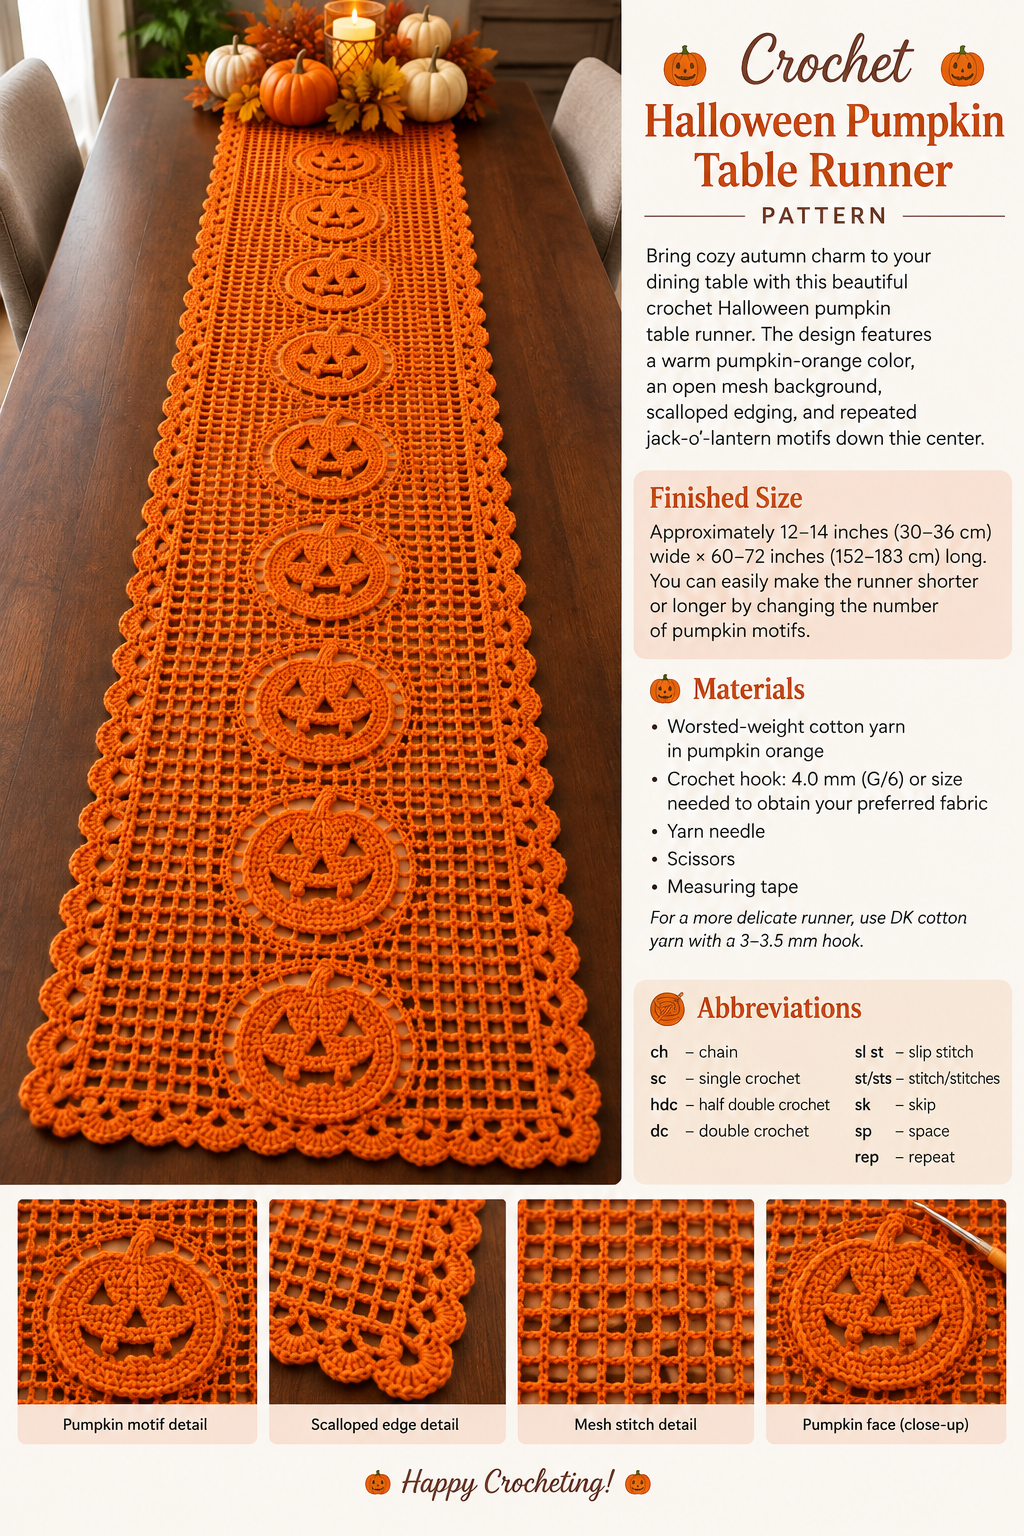
Bring cozy autumn charm to your dining table with this beautiful crochet Halloween pumpkin table runner. The design features a warm pumpkin-orange color, an open mesh background, scalloped edging, and repeated jack-o’-lantern motifs running down the center.
This pattern is a lovely project for Halloween dinners, fall gatherings, Thanksgiving decorating, or simply adding a handmade seasonal touch to your home.
Pattern note: The stitch counts below are an original pattern developed from the design shown in the photo. Because the image does not provide the original designer’s written pattern, your finished runner may vary slightly depending on yarn, hook size, and tension.
🎃 Finished Size
Approximately 12–14 inches (30–36 cm) wide × 60–72 inches (152–183 cm) long.
You can easily make the runner shorter or longer by changing the number of pumpkin motifs.
Materials
- Worsted-weight cotton yarn in pumpkin orange
- Crochet hook: 4.0 mm (G/6) or size needed to obtain your preferred fabric
- Yarn needle
- Scissors
- Measuring tape
For a more delicate runner, use DK cotton yarn with a 3–3.5 mm hook.
Abbreviations
- ch – chain
- sc – single crochet
- hdc – half double crochet
- dc – double crochet
- sl st – slip stitch
- st/sts – stitch/stitches
- sk – skip
- sp – space
- rep – repeat
How to Crochet the Pumpkin Table Runner
1. Create the Foundation
Chain a multiple of 4 + 3 stitches to achieve your desired width.
For a runner approximately 12 inches wide, begin with around 55–59 chains, depending on your yarn and tension.
Row 1
Work 1 dc into the 4th chain from the hook.
Continue working dc across the foundation chain.
Ch 3 and turn.
Rows 2–4
Work 1 dc in each stitch across.
These rows create a firm base at the beginning of the runner.
2. Crochet the Open Mesh Section
The body of the runner uses a simple open mesh to create the lightweight grid visible in the photograph.
Mesh Row
Ch 3, skip the next stitch, and work 1 dc in the following stitch.
Repeat:
Ch 1, sk 1, dc in next stitch
across the row.
Turn.
Following Rows
Repeat the mesh pattern:
Ch 3, dc in the next dc, ch 1, sk the next ch-1 space, dc in the next dc.
Continue until the runner reaches the desired length.
Keep your tension even so the mesh remains rectangular rather than becoming wider or narrower.
3. Add the Pumpkin Motifs 🎃
The centerpiece of the runner consists of repeated round jack-o’-lantern motifs.
For the look shown in the photo, make approximately 7 pumpkin motifs, evenly spaced along the center.
Pumpkin Circle
Make a magic ring.
Round 1
Ch 3, then work 11 dc into the ring.
Join with a sl st.
Round 2
Ch 3.
Work 2 dc in each stitch around.
Join with a sl st.
Round 3
Ch 1.
Work:
sc in next stitch, 2 sc in next stitch
around.
Join with a sl st.
Fasten off or continue directly into the decorative border.
4. Create the Pumpkin Face
The jack-o’-lantern face can be created with crochet stitches or surface crochet.
Use the same orange yarn or a slightly darker shade for the facial details.
Add:
- Two triangular eyes
- A small triangular nose
- A curved smiling mouth
- A small stem at the top
For a raised appearance, use surface slip stitches over the pumpkin circle.
This gives the pumpkin motifs the dimensional look visible in the photograph.
5. Attach the Pumpkin Motifs
Place the pumpkin circles along the center of the mesh runner.
Leave approximately 6–8 inches (15–20 cm) between motifs.
Make sure all pumpkins face the same direction.
Attach each pumpkin using small slip stitches or a yarn needle and matching yarn.
For a more integrated appearance, crochet the pumpkin motifs directly onto the mesh as you work the body.
6. Pumpkin Stem
At the top of each pumpkin, attach a small stem.
A simple version is:
Join yarn → ch 4 → sc back across the chain → sl st to pumpkin.
Fasten off and weave in the end.
7. Decorative Border
The scalloped edging is one of the details that gives this runner its finished appearance.
Work a round of sc around the entire runner first.
At the corners, work 3 sc in the corner space to keep the edge flat.
Scallop Round
Along the side:
sl st in next stitch, skip 1 stitch, 5 dc in next stitch, skip 1 stitch
Repeat around the edge.
The group of 5 dc creates each rounded scallop.
At the corners, adjust the spacing slightly if necessary so the border lies flat.
Finish with a slip stitch and fasten off
