
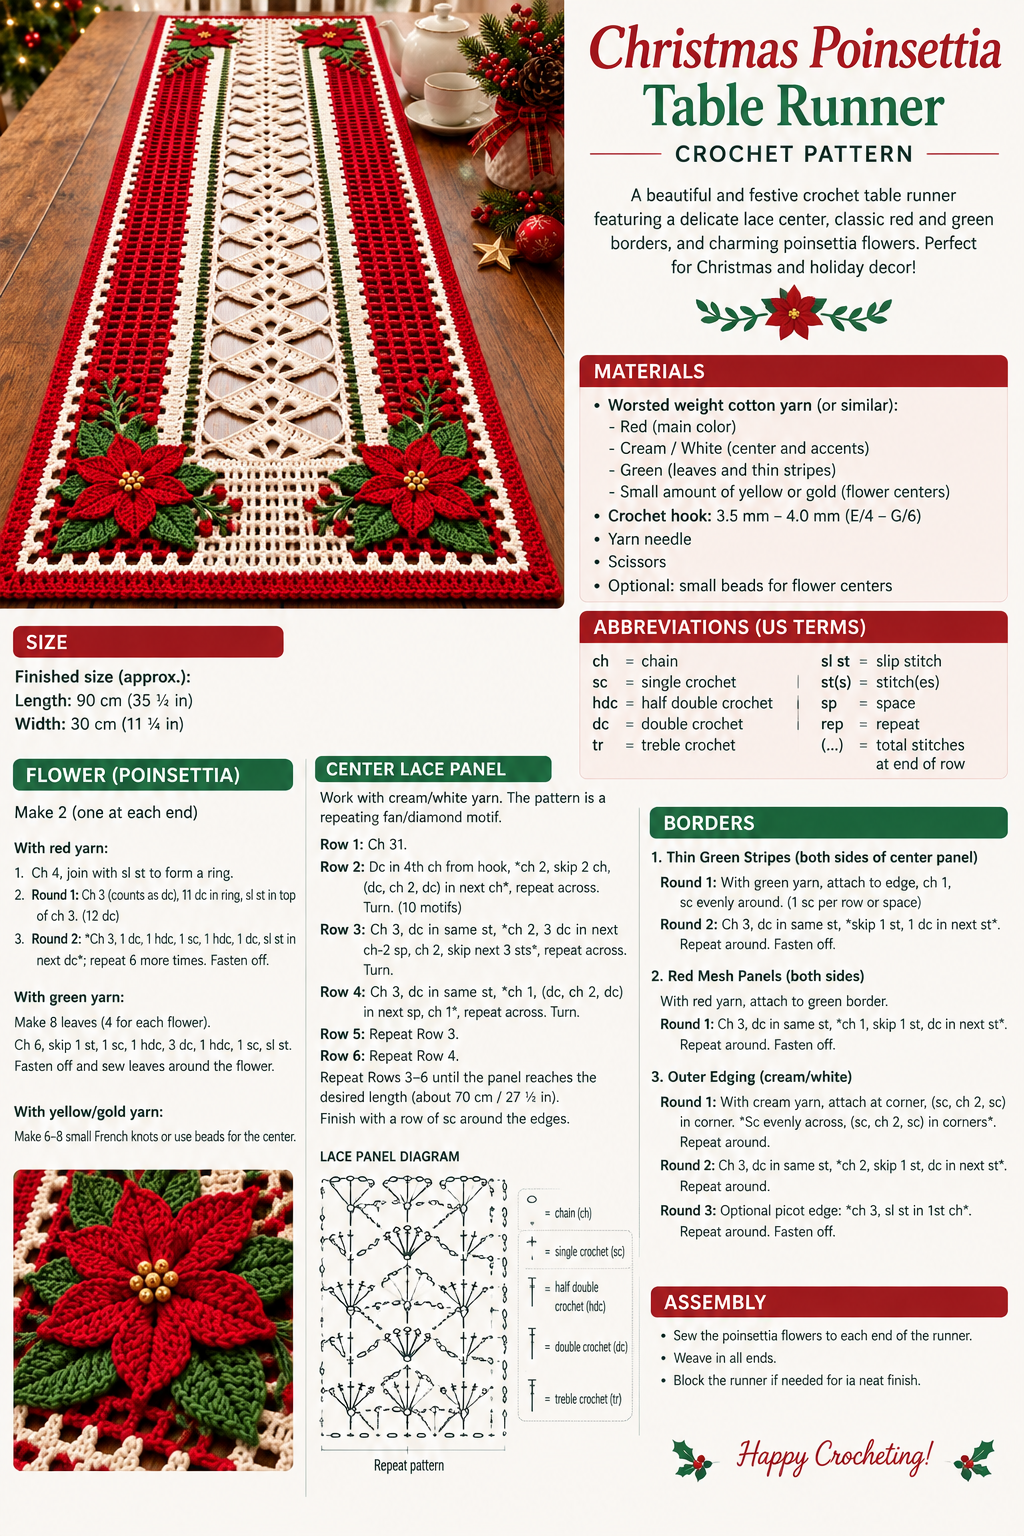
Create a beautiful Christmas Poinsettia Crochet Table Runner featuring rich red and green colors, a delicate cream lace center, and large handmade poinsettia flowers. This festive design is perfect for Christmas dinners, holiday parties, or adding a cozy handmade touch to your dining room.
Pattern note: The photographed runner appears to combine several decorative crochet techniques. Because a finished photo cannot reveal every stitch or gauge, the pattern below is a written original-style pattern designed to recreate the look, rather than a claim of the exact original pattern.
🧶 Materials
- Worsted-weight cotton yarn
- Red: approximately 250–300 g
- Cream/off-white: approximately 200–250 g
- Green: approximately 100–150 g
- Gold/yellow: small amount
- 3.5–4 mm crochet hook
- Yarn needle
- Scissors
- Stitch markers
- Optional: small gold beads for poinsettia centers
📏 Finished Size
Approximately:
- Length: 90–100 cm
- Width: 30–32 cm
You can easily make the runner longer by repeating the center lace section.
Abbreviations — US Crochet Terms
- ch – chain
- sl st – slip stitch
- sc – single crochet
- hdc – half double crochet
- dc – double crochet
- tr – treble crochet
- st/sts – stitch/stitches
- sk – skip
- rep – repeat
🌿 Part 1: Crochet the Center Lace Panel
With cream yarn, chain 31.
Row 1
Dc in the 4th chain from the hook. Dc across.
Row 2
Ch 3, turn.
Skip 1 stitch, dc in the next stitch, ch 2.
Repeat across the row and finish with a dc.
Row 3
Ch 3, turn.
Work a dc in the next dc, ch 2, skip the next 2-chain space, and work 2 dc into the following space.
Repeat the lace pattern across.
Row 4
Ch 3, turn.
Work ch-2 spaces and groups of dc across the row, following the repeating open-lace structure.
Rows 5–30
Repeat Rows 3–4 until the center panel reaches approximately 70–75 cm.
For a longer table runner, simply continue repeating the pattern.
Finish with a row of sc around the entire panel.
❤️ Part 2: Red Mesh Side Panels
The original-inspired design has a red openwork section running along both sides of the cream center.
Attach red yarn along one long side of the center panel.
Row 1
Ch 3.
Dc in the next stitch, ch 1, skip 1 stitch.
Repeat across.
Row 2
Ch 3, turn.
Dc into each dc and ch 1 across.
Rows 3–30
Repeat Row 2 until the red side panel is approximately the same length as the center section.
Repeat on the opposite side.
Tip: Keep your tension consistent so both side panels have the same width.
🌲 Part 3: Green Decorative Stripes
Attach green yarn between the cream center and red mesh.
Work a narrow stripe using sc.
Green Stripe
Row 1: Sc evenly along the edge.
Row 2: Ch 1, turn, sc across.
Row 3: Repeat Row 2.
Work approximately 2–3 rows to create a narrow green accent.
Repeat on the other side.
🌺 Part 4: Crochet Poinsettia Flowers
Make two large poinsettias, one for each end of the runner.
Flower Center
With yellow or gold yarn:
- Ch 4.
- Join with a sl st to form a ring.
- Work 8 sc into the ring.
- Sl st to the first sc.
- Fasten off.
You can sew small gold beads into the center later.
❤️ Red Poinsettia Petals
With red yarn:
Small Petal
Ch 6.
Starting in the 2nd chain from the hook:
- sc
- hdc
- dc
- tr
- 5 tr in the final chain
Continue along the opposite side of the chain:
- tr
- dc
- hdc
- sc
Sl st at the base.
Repeat to create 5–6 petals.
Arrange the petals around the flower center and sew them securely together.
Second Petal Layer
Make another set of 5–6 larger petals using the same basic technique, increasing the length of the starting chain to approximately 8 chains.
Place the larger petals behind the smaller petals.
This creates the layered poinsettia appearance shown in the design.
🍃 Part 5: Crochet Green Leaves
With green yarn, chain 10.
Starting in the second chain from the hook:
sc, hdc, dc, tr, dc, hdc, sc.
Work matching stitches along the opposite side of the chain.
Sl st at the base.
Repeat to make 6–8 leaves.
Arrange the leaves behind the poinsettia and sew them together.
For additional Christmas decoration, add small red berries using tiny crocheted balls or embroidered French knots.
🎄 Part 6: Assemble the Runner
Lay the finished center, red panels, and green accent strips flat.
Sew the sections together using cream or matching yarn.
Place one poinsettia arrangement at each short end of the runner.
For the photographed-style arrangement:
- Place green leaves behind the flowers.
- Add the large red poinsettias on top.
- Add small red berry clusters around the leaves.
- Sew the flower centers securely.
Weave in all yarn ends.
✨ Part 7: Crochet the Outer Border
The border gives the runner its finished Christmas look.
Attach cream yarn around the outside edge.
Border Round 1
Ch 1 and sc evenly around the entire runner.
At each corner:
sc, ch 2, sc
This keeps the corners flat.
Border Round 2
Attach green yarn.
Sc around the runner, placing 3 sc in each corner space.
Fasten off.
Border Round 3
Attach cream yarn.
Work:
Ch 3, skip 1 stitch, sc in next stitch.
Repeat around the runner to create an open decorative edge.
Final Red Border
Attach red yarn.
Work sc around the entire outside edge.
At each corner, work 3 sc into the corner stitch or space.
Fasten off and weave in the ends.
🧼 Blocking & Finishing
For the best finished appearance:
- Gently wash the runner according to the yarn manufacturer’s instructions.
- Lay it flat on a clean towel.
- Shape the corners and edges.
- Stretch the lace sections gently into place.
- Allow the runner to dry completely.
Blocking will help the lace center become more defined and give the runner a professional finish.
🎁 Decorating Ideas
This Christmas crochet table runner looks beautiful with:
- White or cream dinnerware
- Red Christmas plates
- Pine branches
- Gold candles
- Christmas ornaments
- Red berries
- Pinecones
- A simple white tablecloth underneath
The combination of cream, Christmas red, and deep green gives the project a classic holiday appearance.
❤️ Final Thoughts
This Christmas Poinsettia Crochet Table Runner is a wonderful handmade project for holiday decorating. The repeating lace center makes it easy to customize the length, while the poinsettia flowers and rich Christmas colors create a beautiful festive centerpiece.
Save this pattern for your Christmas crochet projects and share it with someone who loves handmade holiday decor! 🎄🧶🌺
