
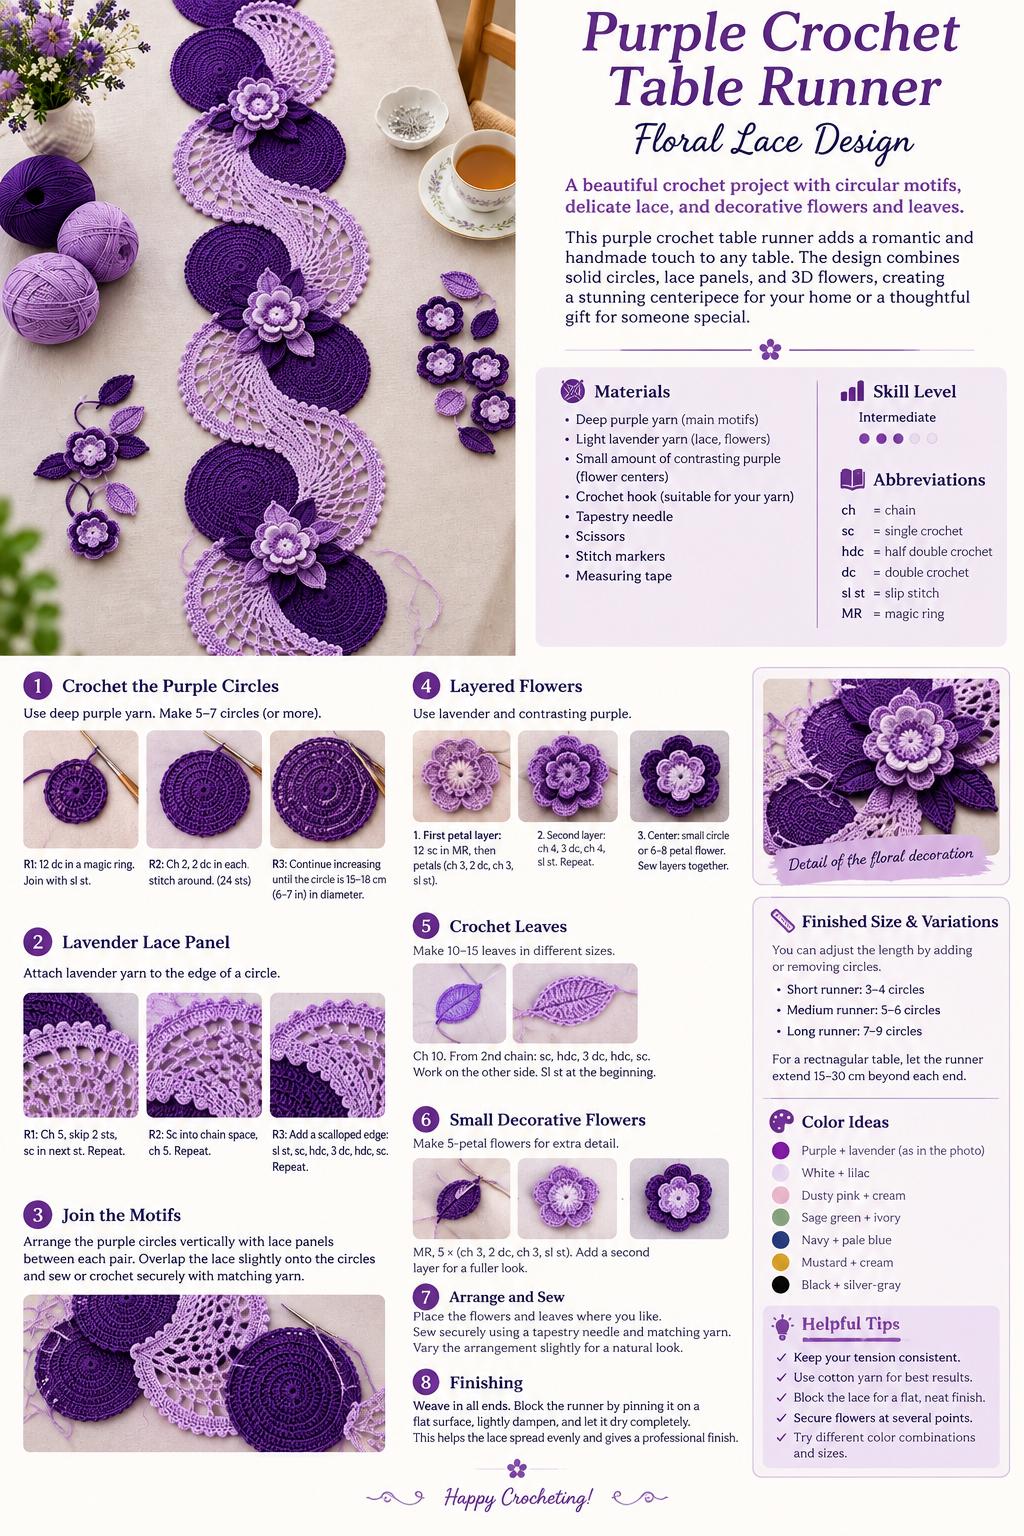
Create a beautiful purple crochet table runner inspired by the delicate combination of round crochet motifs, floral appliqués, leaves, and flowing lace. This design has a romantic, handmade look and works beautifully as a dining-table centerpiece, dresser runner, or decorative accent.
The pattern combines deep purple solid crochet circles with soft lavender openwork lace, then decorates the joins with layered flowers and leaves.
🌸 Purple Crochet Floral Lace Table Runner
This pattern is worked as a series of round motifs connected by a flowing lace section. The contrasting colors give the finished piece a dimensional appearance while the flowers add a pretty three-dimensional detail.
Skill Level
Intermediate
You should be comfortable with:
- Magic ring
- Chain stitches
- Single crochet
- Half double crochet
- Double crochet
- Slip stitch
- Increasing
- Working in rounds
- Basic crochet lace
- Sewing crochet motifs together
Materials
- Deep purple crochet cotton/yarn – main motifs
- Light lavender crochet cotton/yarn – lace sections and flowers
- Small amount of contrasting purple for flower centers
- Crochet hook suitable for your yarn
- Tapestry needle
- Scissors
- Stitch markers
- Measuring tape
For a table runner similar to the pictured design, a fine or lightweight cotton yarn will give the best lace definition.
Finished Design
The runner consists of:
- Large deep-purple circular motifs
- Lavender lace panels connecting the circles
- Layered crochet flowers
- Crochet leaves
- Small decorative flowers along the sides
You can make the runner as long or short as you like by adding or removing circular motifs.
Part 1: Crochet the Purple Circles
Begin with the deep-purple yarn.
Round 1
Make a magic ring.
Work 12 double crochet into the ring. Pull the ring closed and join with a slip stitch.
Round 2
Chain 2.
Work 2 double crochet into each stitch around.
Join with a slip stitch.
24 stitches
Round 3
Chain 2.
1 double crochet in the next stitch, 2 double crochet in the following stitch.
Repeat around.
Join.
Round 4
Chain 2.
1 double crochet in the next 2 stitches, 2 double crochet in the next stitch.
Repeat around.
Continue increasing in this manner until your circle reaches approximately 15–18 cm (6–7 inches) in diameter.
For a flatter circle, space your increases evenly around the round.
Fasten off and weave in the ends.
Make approximately 5–7 circles, depending on the desired length of your runner.
Part 2: Lavender Lace Panel
The lace section is what creates the flowing, open appearance seen between the purple circles.
Attach lavender yarn to the edge of a purple circle.
A simple lace repeat can be made using:
Chain 5, skip 2 stitches, single crochet in the next stitch.
Repeat across the section.
On the next row:
Single crochet into the chain space, chain 5.
Repeat across.
Continue building the mesh until the lace section reaches approximately 8–12 cm wide.
For a more decorative edge, work a scalloped border:
Slip stitch, single crochet, half double crochet, 3 double crochet, half double crochet, single crochet.
Repeat along the outer edge.
This creates the soft scalloped appearance visible around the lace panels.
Part 3: Joining the Motifs
Arrange the purple circles vertically.
Place a lavender lace panel between each pair of circles.
The lace should overlap slightly onto the circles rather than forming a completely straight rectangular strip. This gives the runner its flowing, curved appearance.
Sew or crochet the lace securely to the circles using matching lavender yarn.
Try to keep the joins neat because they will become the foundation for the flowers.
Part 4: Crochet the Layered Flowers
The flowers are the main decorative feature of this design.
Use lavender yarn for the outer petals and a lighter or darker purple for the center.
First Petal Layer
Make a magic ring.
Work:
12 single crochet into the ring.
Join with a slip stitch.
For each petal:
Slip stitch into the next stitch, chain 3, 2 double crochet, chain 3, slip stitch into the same stitch.
Repeat around.
You should have a small flower with several rounded petals.
Second Petal Layer
Attach a second shade of purple behind the first flower.
For each petal, work:
Slip stitch, chain 4, 3 double crochet, chain 4, slip stitch.
Repeat around.
This creates a larger flower behind the first layer.
Flower Center
For the center, make a small circle using contrasting yarn.
You can also add a tiny six- or eight-petal flower to the center.
Sew the three layers together.
Make approximately 3–5 large flowers for the runner.
Part 5: Crochet Leaves
The leaves can be made in both purple shades to create contrast.
Simple Leaf
Chain 10.
Starting in the second chain from the hook:
- 1 single crochet
- 1 half double crochet
- 3 double crochet
- 1 half double crochet
- 1 single crochet
Work down the opposite side of the foundation chain using the same stitches.
Slip stitch at the beginning.
Fasten off.
For a pointed leaf, add a slip stitch or single crochet at the tip.
Make approximately 10–15 leaves in different sizes.
Part 6: Arrange the Flowers and Leaves
Place the largest flowers where the lavender lace joins the purple circles.
Arrange leaves underneath and around each flower.
A pleasing arrangement is:
Flower → two or three leaves → small flower → leaf
Avoid making every flower arrangement identical. Slight variations make the handmade design look more natural.
Sew each piece firmly into position using a tapestry needle and matching yarn.
Part 7: Small Decorative Flowers
For the smaller flowers around the runner, make a simple five-petal flower.
Small Flower
Make a magic ring.
Work:
5 × (chain 3, 2 double crochet, chain 3, slip stitch into ring).
Pull the ring tight and join.
For a fuller flower, add a second layer of petals behind the first.
These small flowers can be attached individually to the outer lace edge or placed between the larger floral clusters.
Finishing the Runner
Once all motifs are attached, carefully weave in all yarn ends.
Lay the runner flat on a towel or blocking mat.
Lightly dampen it and gently shape the lace sections.
Pin the edges into position and allow the runner to dry completely.
This process, known as blocking, helps the open lace stitches spread evenly and gives the runner a professional finish.
Color Ideas
Although the original design uses purple and lavender, this pattern would look beautiful in many combinations.
Try:
- 💜 Deep purple + lavender
- 🤍 White + lilac
- 🌸 Dusty pink + cream
- 🌿 Sage green + ivory
- 💙 Navy + pale blue
- 🌼 Mustard + cream
- 🖤 Black + silver-gray
For a more vintage appearance, use several closely related shades rather than a strong contrast.
Customize Your Crochet Runner
One of the best things about this design is that it can easily be customized.
Short Runner
Use 3–4 large circles.
Medium Runner
Use 5–6 circles.
Long Table Runner
Use 7–9 circles.
You can also increase the size of each circular motif for a wider centerpiece.
For a rectangular table, allow the runner to extend approximately 15–30 cm beyond each end of the table.
Helpful Crochet Tips
Keep your tension consistent.
The circular motifs should remain flat rather than becoming bowl-shaped.
Block the lace.
Blocking makes a particularly big difference with open crochet patterns.
Use cotton yarn.
Cotton holds the shape of lace well and is practical for a table runner.
Secure your flowers carefully.
Because the flowers are raised, sew them down at several points rather than attaching them only through the center.
Experiment with placement.
Before sewing everything together, arrange the flowers and leaves on the runner and take a photograph. This makes it easier to adjust the composition.
