
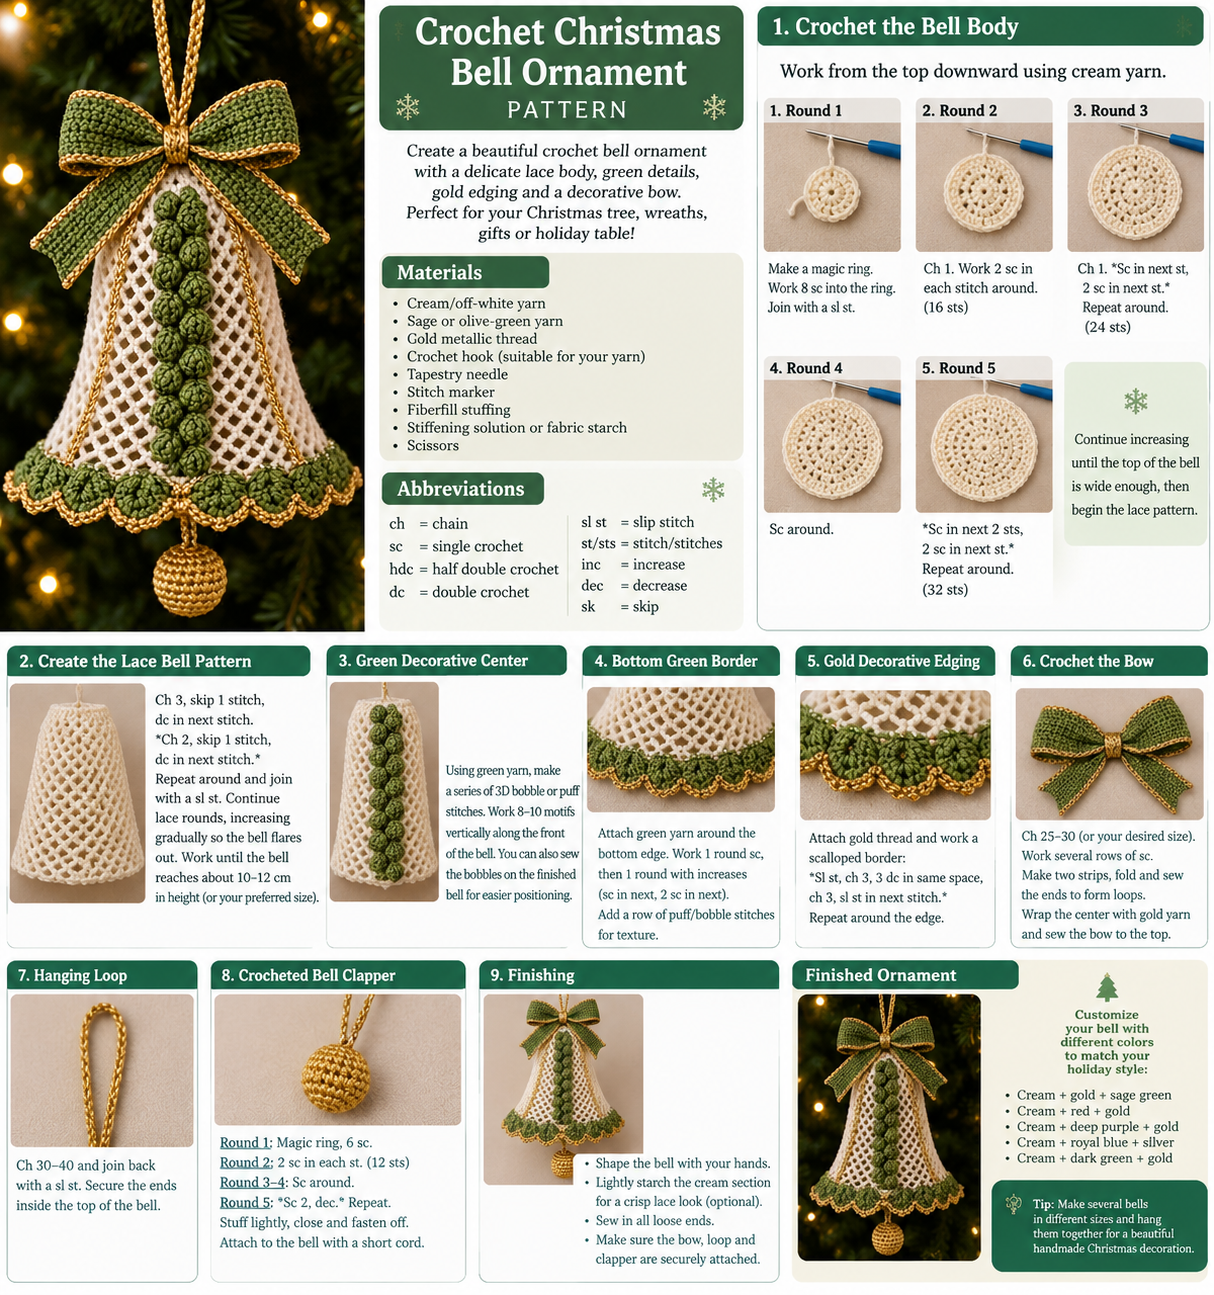
Create a beautiful crochet Christmas bell ornament inspired by the photo, featuring a delicate cream lace body, sage-green details, golden edging, a decorative bow, and a small crocheted bell clapper. This elegant ornament is perfect for decorating your Christmas tree, wreaths, gifts, or holiday table.
Pattern note: The original image does not provide an official written pattern, so the instructions below are a recreated pattern inspired by the pictured design. You may need to adjust stitch counts slightly depending on your yarn and tension.
Materials
- Cream/off-white crochet yarn
- Sage or olive-green yarn
- Gold metallic crochet thread
- Crochet hook suitable for your yarn
- Tapestry needle
- Stitch marker
- Fiberfill stuffing
- Small amount of stiffening solution or fabric starch
- Scissors
Suggested yarn
Use fine cotton or cotton-blend yarn for a neat lace appearance. A smaller hook will give the bell enough structure to hold its shape.
Abbreviations
- ch – chain
- sc – single crochet
- hdc – half double crochet
- dc – double crochet
- sl st – slip stitch
- st/sts – stitch/stitches
- inc – increase
- dec – decrease
- sk – skip
1. Crochet the Bell Body
The bell is worked from the top downward.
Round 1
With cream yarn, make a magic ring.
Work 8 sc into the ring. Join with a sl st.
Round 2
Ch 1. Work 2 sc in each stitch around.
You should have 16 sts.
Round 3
Ch 1.
Sc in next st, 2 sc in next st.
Repeat around.
24 sts.
Round 4
Sc around.
Round 5
Sc in next 2 sts, 2 sc in next st.
Repeat around.
32 sts.
Continue increasing in this manner until the top of the bell reaches the desired width.
2. Create the Lace Bell Pattern
Once the top section is wide enough, begin the openwork pattern.
Lace Round
Ch 3, skip 1 stitch, dc in next stitch.
Ch 2, skip 1 stitch, dc in next stitch.
Repeat around and join with a sl st.
This creates the characteristic diamond/lattice openings visible on the cream portion of the ornament.
Continue working lace rounds while gradually increasing the circumference toward the bottom.
Shaping
On selected rounds, add an extra chain space or work two stitches into strategically placed spaces. This allows the bell to flare outward rather than remain cylindrical.
Continue until the bell reaches approximately 10–12 cm in height, or your preferred size.
3. Green Decorative Center
The original design has a raised green floral/leaf-like column running vertically down the front.
Using green yarn, work a series of small 3D bobble or puff stitches.
Green Bobble
- Insert hook into the selected stitch/space.
- Yarn over and pull up a loop.
- Repeat several times in the same location.
- Yarn over and pull through the loops to close the puff.
- Secure with a slip stitch.
Make approximately 8–10 raised motifs vertically along the front of the bell.
You can also sew the individual green bobbles onto the finished cream bell for easier positioning.
4. Green Bottom Border
Attach green yarn around the bottom edge.
Work:
Round 1: Sc evenly around.
Round 2: Sc in next stitch, 2 sc in next stitch. Repeat around.
Round 3: Work a series of small puff/bobble stitches around the edge to create the textured green border.
Finish with a gold edging.
5. Gold Decorative Edging ✨
Attach gold thread to the bottom edge.
Work a simple scalloped border:
Sl st, ch 3, 3 dc in same space, ch 3, sl st in next stitch.
Repeat around the entire bell.
This creates the small gold scallops seen along the bottom of the ornament.
For a stronger metallic effect, use gold thread with a slightly smaller hook.
6. Crochet the Bow 🎀
Using green yarn, make a rectangular strip.
Bow
Ch approximately 25–30, depending on the desired bow size.
Work several rows of sc until the strip is approximately 3–4 cm wide.
Fasten off.
Make a second strip of the same size.
Fold each strip toward the center and sew the ends together to form two loops.
Place the two loops together and wrap the center tightly with gold yarn.
Sew the bow securely to the top of the bell.
Add gold edging around the bow if desired.
7. Hanging Loop
At the top of the ornament, attach gold thread.
Ch 30–40 and join back to the starting point with a sl st.
Secure the ends firmly inside the top of the bell.
This creates the hanging loop for the Christmas tree.
8. Crocheted Bell Clapper
Using gold yarn:
Round 1
Magic ring, 6 sc.
Round 2
2 sc in each stitch around.
12 sts.
Round 3
Sc around.
Round 4
Sc around.
Round 5
Begin decreasing:
Sc 2, dec. Repeat around.
Continue decreasing until the opening becomes small.
Add a tiny amount of fiberfill.
Close the opening and fasten off.
Attach the small gold ball to the bottom of the bell with a short crocheted or braided cord.
Finishing
Carefully shape the bell with your fingers.
If you want a crisp lace appearance, lightly starch the cream portion and allow it to dry completely while holding the desired bell shape.
Sew in all loose ends.
Finally, check that the bow, hanging loop, and bottom clapper are securely attached.
🎄 Finished Ornament
Your finished crochet bell combines cream lacework, textured green accents, gold trim, and a decorative bow for an elegant Christmas-tree ornament.
You can easily customize it by changing the colors—for example:
- 🤍 Cream + gold + sage green
- ❤️ Cream + red + gold
- 💜 Cream + deep purple + gold
- 💙 Cream + royal blue + silver
- 🌲 Cream + dark green + gold
Tip: Make several bells in different sizes and hang them together to create a beautiful handmade Christmas decoration.
