
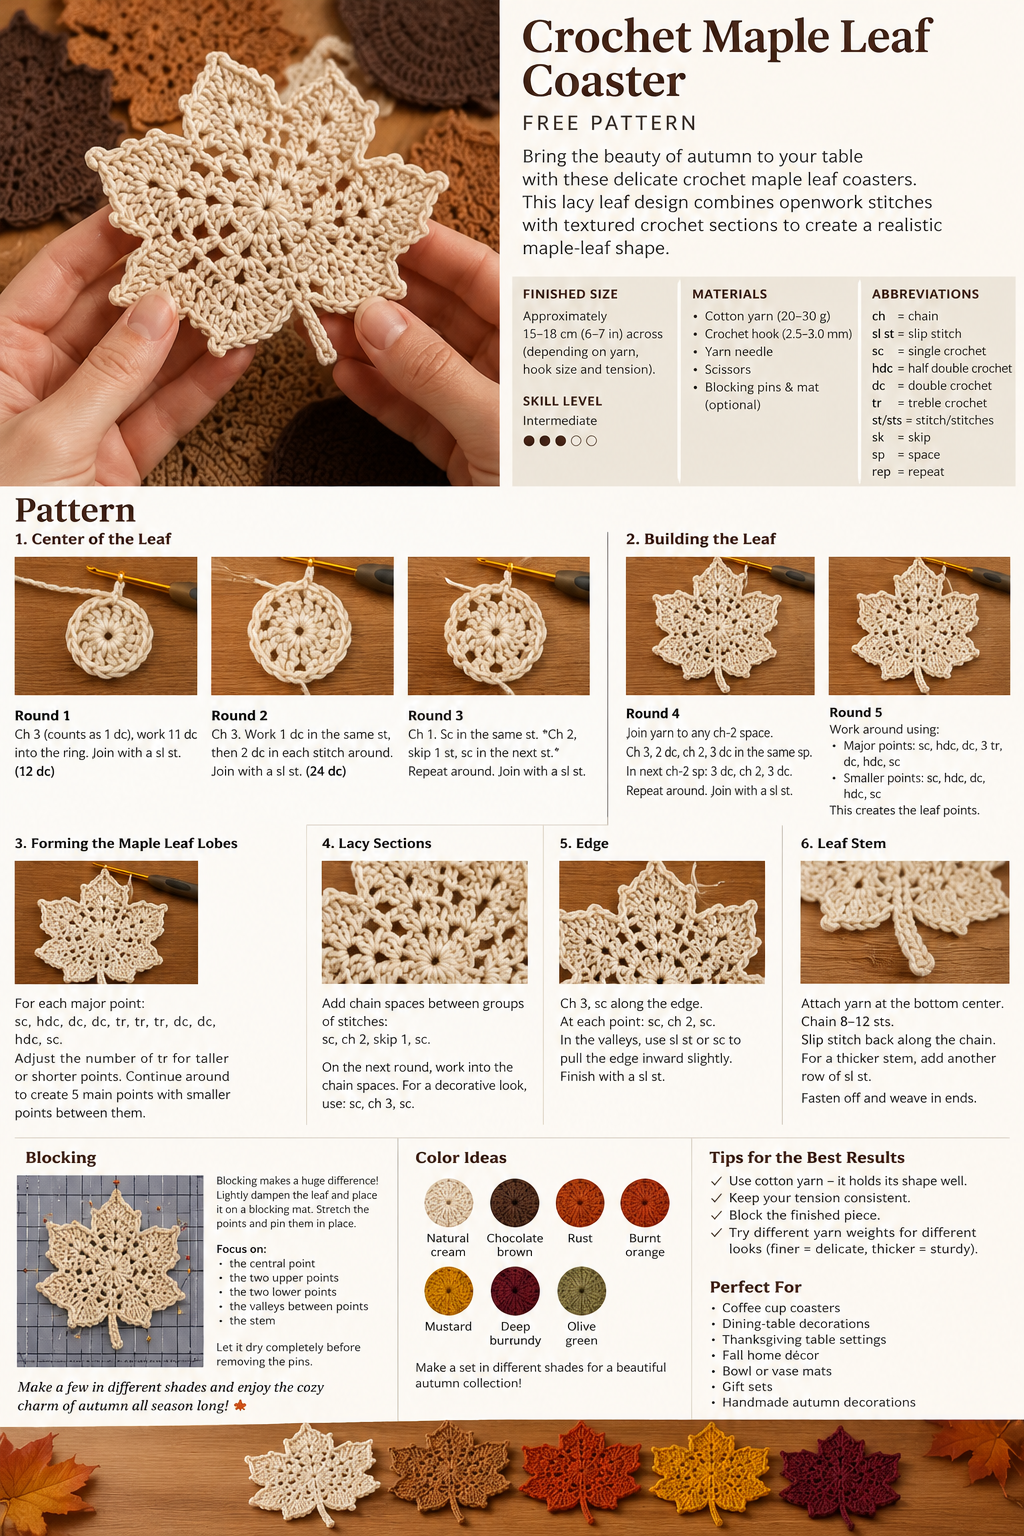
Bring the beauty of autumn to your table with these delicate crochet maple leaf coasters. This lacy leaf design combines openwork stitches with textured crochet sections to create a realistic maple-leaf shape. Make them in cream, rust, brown, mustard, or deep burgundy for a beautiful fall-inspired set.
The pattern below is an original pattern inspired by the shape and construction visible in the provided photo; the image alone cannot establish the exact original stitch counts or designer’s pattern.
🍁 Crochet Maple Leaf Coaster Pattern
Skill Level
Intermediate
The pattern uses basic crochet stitches together with clusters, chains, increases, and decreases. The leaf is worked in sections to create the characteristic pointed maple-leaf silhouette.
Finished Size
Approximately 15–18 cm (6–7 in) across, depending on yarn, hook size, and tension.
You can easily make the coaster larger or smaller by changing your yarn weight and hook size.
Materials
- Cotton crochet yarn, approximately 20–30 g
- Crochet hook suitable for your yarn
Suggested: 2.5–3.0 mm - Yarn needle
- Scissors
- Blocking pins and a blocking mat, optional
For the look shown in the photo, choose a fine or sport-weight cotton yarn in a natural cream, beige, brown, or autumn shade.
Abbreviations
US crochet terminology:
- ch – chain
- sl st – slip stitch
- sc – single crochet
- hdc – half double crochet
- dc – double crochet
- tr – treble crochet
- st/sts – stitch/stitches
- sk – skip
- sp – space
- rep – repeat
Pattern
Center of the Leaf
Start with a magic ring.
Round 1:
Ch 3 (counts as 1 dc), work 11 dc into the ring. Join with a sl st to the top of the beginning ch-3.
12 dc
Round 2:
Ch 3. Work 1 dc in the same stitch, then 2 dc in each stitch around. Join with a sl st.
24 dc
Round 3:
Ch 1. Sc in the same stitch. Ch 2, skip 1 stitch, sc in the next stitch. Repeat around. Join with a sl st.
You should now have a ring of small chain spaces. These spaces will give the center of the leaf its open, lace-like appearance.
Building the Leaf
The maple-leaf shape is created by working groups of stitches into the chain spaces.
Round 4
Join yarn to any ch-2 space.
Ch 3, 2 dc, ch 2, 3 dc in the same space.
In the next ch-2 space, work:
3 dc, ch 2, 3 dc
Repeat around until you reach the beginning. Join with a sl st.
Do not worry if the piece looks somewhat round at this stage. The points are formed in the following rounds.
Round 5 – Creating the Points
Work around the previous round, using the following general sequence:
sc, hdc, dc, 3 tr, dc, hdc, sc
Work these stitches around selected chain spaces to begin forming the larger points of the maple leaf.
Between the larger points, use smaller groups of:
sc, hdc, dc, hdc, sc
This creates the alternating high and low sections characteristic of a maple leaf.
Forming the Maple Leaf Lobes
The leaf has several distinct points. Rather than making a simple circular coaster, gradually build each point outward.
For each major point:
- Work several stitches into the same space.
- Increase toward the center of the point.
- Use treble crochet for the tallest section.
- Decrease with shorter stitches as you move back toward the valley.
A typical point can be shaped with:
sc, hdc, dc, dc, tr, tr, tr, dc, dc, hdc, sc
For a taller, sharper point, add another tr in the center.
For a smaller point, replace the treble stitches with dc.
Continue around the leaf, creating approximately five main points with smaller points between them.
Creating the Lacy Sections
To reproduce the openwork appearance seen in the photograph, add small chain spaces between groups of stitches.
Where indicated, work:
sc, ch 2, skip 1, sc
On the next round, work stitches into the chain spaces.
For a more decorative section, use:
sc, ch 3, sc
This produces the small openings that give the leaf a delicate, lace-like appearance.
Leaf Edge
Once all the major points are established, crochet a decorative edging around the entire leaf.
Starting at the base:
Sc in each stitch along the edge.
At the tip of each point, work:
sc, ch 2, sc
This helps sharpen the points.
In the valleys between points, use a slip stitch or single crochet to pull the edge inward slightly.
Continue around the entire leaf and finish with a sl st.
Fasten off and leave a long tail if you want to create the leaf stem.
🍂 Crochet Leaf Stem
The stem gives the finished coaster its recognizable maple-leaf appearance.
Attach yarn at the bottom center of the leaf.
Chain approximately 8–12 stitches.
Slip stitch back along the chain toward the leaf.
For a slightly thicker stem, work another row of slip stitches over the first row.
Fasten off and weave in the ends.
Blocking
Blocking makes a huge difference with this pattern.
Lightly dampen the finished leaf and place it on a blocking mat. Carefully stretch the five main points into shape and pin them in place.
Pay particular attention to:
- The central point
- The two upper points
- The two lower points
- The small valleys between the points
- The stem
Allow the leaf to dry completely before removing the pins.
This will give the coaster the crisp, open shape shown in the photograph.
🍁 Color Ideas
Create an entire autumn collection by using different shades:
- 🤍 Natural cream
- 🤎 Chocolate brown
- 🧡 Rust
- 🍂 Burnt orange
- 💛 Mustard
- ❤️ Deep burgundy
- 🌿 Olive green
For a rustic table setting, make each leaf a different autumn color.
Tips for the Best Results
Use cotton yarn. Cotton holds its shape well and works particularly nicely for coasters.
Keep your tension consistent. If your stitches are too loose, the lace sections can become floppy. If they are too tight, the leaf may curl.
Block the finished piece. Blocking is especially important for this design because it opens up the lacework and defines the maple-leaf points.
Experiment with yarn weight. A finer yarn creates a delicate decorative leaf, while thicker cotton produces a sturdier coaster.
How to Use Your Crochet Maple Leaves
These leaves work beautifully as:
- Coffee cup coasters
- Dining-table decorations
- Thanksgiving table settings
- Fall home décor
- Bowl or vase mats
- Gift sets
- Handmade autumn decorations
Make four or six leaves in coordinating colors and tie them together with a simple piece of twine for a charming handmade gift.
Final Thoughts
This crochet maple leaf is a lovely project for using up small amounts of cotton yarn while creating something seasonal and practical. The combination of open lacework, textured stitch groups, pointed lobes, and a simple crocheted stem gives the finished piece its delicate autumn appearance.
Make a few in different shades and you’ll have a beautiful handmade set that can be enjoyed throughout the fall season. 🍁
